- Published on
Infrastructure as Code Deployment
Part 3A of "Deploy Static Website To AWS"
Table of Contents
- Overview
- The Goal
- The architecture
- Benefits
- Limitations
- Pre-Requisites
- Pre-Requisites for Creating resources from from scratch (Part 3A)
- Pre-Requisites for Importing Existing AWS Resources into a CloudFormation Stack (Part 3B)
- Required DNS Record Set
- Part 3A Creating Resources from Scratch
- Infrastructure Project Setup
- Initial Deployment
- What Just Happened?
- Create the Rest of the Resources
- Origin Access Control
- Static Files S3 Bucket Policy
- CloudFront Distribution
- Additional DNS Records
- Final Deployment
- Copy Web App to S3 Bucket
- TLDR
- What's next?
Overview
The Goal
This post aims to convert the work that we have done in the previous post into template that will simplify the process by creating and configuring the resources. CloudFormation handles the provisioning and management of resources defined in a template.
Note: Although, the Custom domain and the SSL Certificate can be included and managed in the CloudFormation stack, these resources are assumed to have been created manually and will exist outside of the Stack. This is because we intend to deploy multiple environments which will use the same domain and certificate.
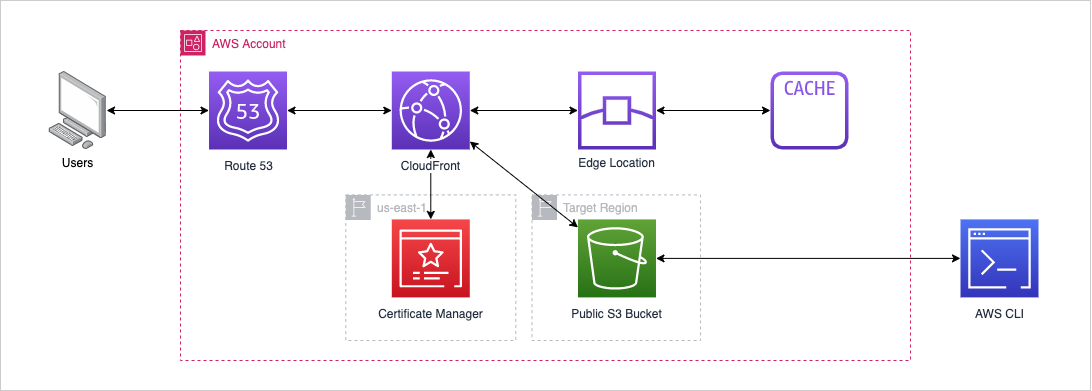
The architecture
A reminder of the architecture from Part 2: 
Benefits
Some of the benefits of using this approach are:
- Re-usable and repeatable pattern
- Create and test multiple environments
- Spin up infrastructure for a different website using the same template
- Little change for new environments or projects
- Logical grouping of all resources
- Easy to keep track of and update resources
- Delete all resources by deleting the stack
- Atomic
- All or nothing deployments
- Roll-back if an error occurs
- Reduces errors
- Resources and their properties can be identified by reference (rather than hardcoded)
- Find errors a lot quicker
- A lot of the configuration errors will baulk the deployment
- Some errors may still only become apparent during tests
Limitations
- Front-end is still quite cumbersome
- With each new blog post the Front-End needs to be re-rendered and built
- Built files need to be copied to the bucket manually
Pre-Requisites
- An AWS account
- AWS CLI installed and configured
- A Registered Domain Name
- An SSL Certificate in AWS Certificate Manager,
us-east-1region - And one of the below pre-requisite sections:
Pre-Requisites for Creating resources from from scratch (Part 3A)
- Start from here without starting Part 1 or Part 2 of this series or to create a new environment
- Part 3B (the next post) is not required
- Alternatively, start from here to create a new version / stage (we are using
dev) - Assume that the Domain (with below DNS Record Set) and Hosted Zone are configured in Route 53 (these will have been configured if the domain was purchased via Route 53)
- Assume that a Certificate is configured
Pre-Requisites for Importing Existing AWS Resources into a CloudFormation Stack (Part 3B)
- For those following on from Part 2 and want to use the existing resources in the infrastructure
- Assume the following resources are correctly configured
- Custom Domain in Route 53 with Hosted Zone
- Certificate
- WebApp S3 Bucket
- CloudFront Distribution
- Go to Part 3
Required DNS Record Set
| Record Name | Type | Value |
|---|---|---|
example.com | NS | UNIQUE_IDENTIFIER.net., UNIQUE_IDENTIFIER.com., UNIQUE_IDENTIFIER.org., and UNIQUE_IDENTIFIER.co.uk. |
example.com | SOA | One of the NS Value records |
_UNIQUE_IDENTIFIER.wwww.example.com | CNAME | _UNIQUE_IDENTIFIER.acm-validations.aws. |
_UNIQUE_IDENTIFIER.example.com | CNAME | _UNIQUE_IDENTIFIER.acm-validations.aws. |
Part 3A Creating Resources from Scratch
Infrastructure Project Setup
Create a new project folder outside of the front-end directorymkdir starter-blog-infra
Install Serverless Framework see here for more information:npm install -g serverless
Create the serverless.yml file with the below contents. This file defines the resources and resource settings which will be created by CloudFormation. This template only defines the private S3 bucket for now.
# serverless.yml
service: sls-deploy

frameworkVersion: '3'

provider:
  name: aws
  runtime: python3.8

custom:
  env: ${file(./.config/env.json):${opt:stage, 'dev'}}
  domainName: ${self:custom.env.domainName}
  hostedZoneId: ${self:custom.env.hostedZoneId}
  hostedZone: ${self:custom.env.hostedZone}
  s3Bucket: ${self:custom.env.s3Bucket}
  certificateId: ${self:custom.env.certificateId}
  aliases: ${self:custom.env.aliases}

resources:
  Resources:
    WebAppS3Bucket:
      Type: AWS::S3::Bucket
      Properties:
        BucketName: ${self:custom.s3Bucket}
        AccessControl: Private
        WebsiteConfiguration:
          IndexDocument: index.html
          ErrorDocument: index.html
Create the file to house the environment variables. This is done to keep the environment variables out of the serverless.yml file, allowing these to be omitted from the git repository.mkdir .config touch .config/env.json
// .config/env.json
{
    "dev": {
        "domainName": "dev.example.com",
        "hostedZoneId": "HOSTED_ZONE_ID", // Found in: Route 53 > Hosted Zones > example.com
        "hostedZone": "example.com",
        "s3Bucket": "dev.example.com",
        "certificateId": "CERTIFICATE_ID",
        "aliases": [
            "dev.example.com" // Note difference between dev an prod aliases. Aliases cannot be shared by multiple different distributions
        ]
    },
    "prod": {
        "domainName": "example.com",
        "hostedZoneId": "HOSTED_ZONE_ID", // Found in Route 53 > Hosted Zones > example.com
        "hostedZone": "example.com",
        "s3Bucket": "example.com",
        "certificateId": "CERTIFICATE_ID", // Found in: AWS Certificate Manager > Certificates
        "aliases": [
            "example.com",
            "www.example.com",
        ]
    }
}
So far, the infrastructure directory should contain the following files:
.
├── .config
│   └── env.json
└── serverless.yml
Initial Deployment
Deploy the stack with the bucketsls deploy --region ap-southeast-2 --stage dev --verbose orsls deploy --region us-west-1 --stage prod --verbose
Note: In this example the ap-southeast-2 region is used and may need to be replaced with the target region. In order to deploy to the root domain example.com use the prod staged.
Running this command with the --verbose flag will output the events as they occur:
$ sls deploy --region ap-southeast-2 --stage dev --verbose

Deploying sls-deploy to stage dev (ap-southeast-2)

Packaging
Retrieving CloudFormation stack
Creating CloudFormation stack
Creating new change set
Waiting for new change set to be created
Change Set did not reach desired state, retrying
Executing created change set
  CREATE_IN_PROGRESS - AWS::CloudFormation::Stack - sls-deploy-dev
  CREATE_IN_PROGRESS - AWS::S3::Bucket - ServerlessDeploymentBucket
  CREATE_IN_PROGRESS - AWS::S3::Bucket - ServerlessDeploymentBucket
  CREATE_COMPLETE - AWS::S3::Bucket - ServerlessDeploymentBucket
  CREATE_IN_PROGRESS - AWS::S3::BucketPolicy - ServerlessDeploymentBucketPolicy
  CREATE_IN_PROGRESS - AWS::S3::BucketPolicy - ServerlessDeploymentBucketPolicy
  CREATE_COMPLETE - AWS::S3::BucketPolicy - ServerlessDeploymentBucketPolicy
  CREATE_COMPLETE - AWS::CloudFormation::Stack - sls-deploy-dev
Uploading
Uploading CloudFormation file to S3
Uploading State file to S3
Updating CloudFormation stack
Creating new change set
Waiting for new change set to be created
Change Set did not reach desired state, retrying
Executing created change set
  UPDATE_IN_PROGRESS - AWS::CloudFormation::Stack - sls-deploy-dev
  CREATE_IN_PROGRESS - AWS::S3::Bucket - WebAppS3Bucket
  CREATE_IN_PROGRESS - AWS::S3::Bucket - WebAppS3Bucket
  CREATE_COMPLETE - AWS::S3::Bucket - WebAppS3Bucket
  UPDATE_COMPLETE_CLEANUP_IN_PROGRESS - AWS::CloudFormation::Stack - sls-deploy-dev
  UPDATE_COMPLETE - AWS::CloudFormation::Stack - sls-deploy-dev
Retrieving CloudFormation stack
Removing old service artifacts from S3

✔ Service deployed to stack sls-deploy-dev (77s)


Stack Outputs:
  ServerlessDeploymentBucketName: sls-deploy-dev-serverlessdeploymentbucket-UNIQUE_IDENTIFIER
Note: If an error message similar to Error: CREATE_FAILED: WebAppS3Bucket (AWS::S3::Bucket) ... is displayed and you would like to use this resource in the deployment, follow part 3 in order to import existing resources into the stack.
What Just Happened?
- CloudFormation templates are created (located in the
.serverless.ymlfolder)- Create stack template
- Update stack template
- Serverless state template
- A deployment bucket and policy was is created without being defined in the template
- Serverless Framework creates the compiled template which is uploaded to the deployment bucket
- CloudFormation uses the template to create the resources
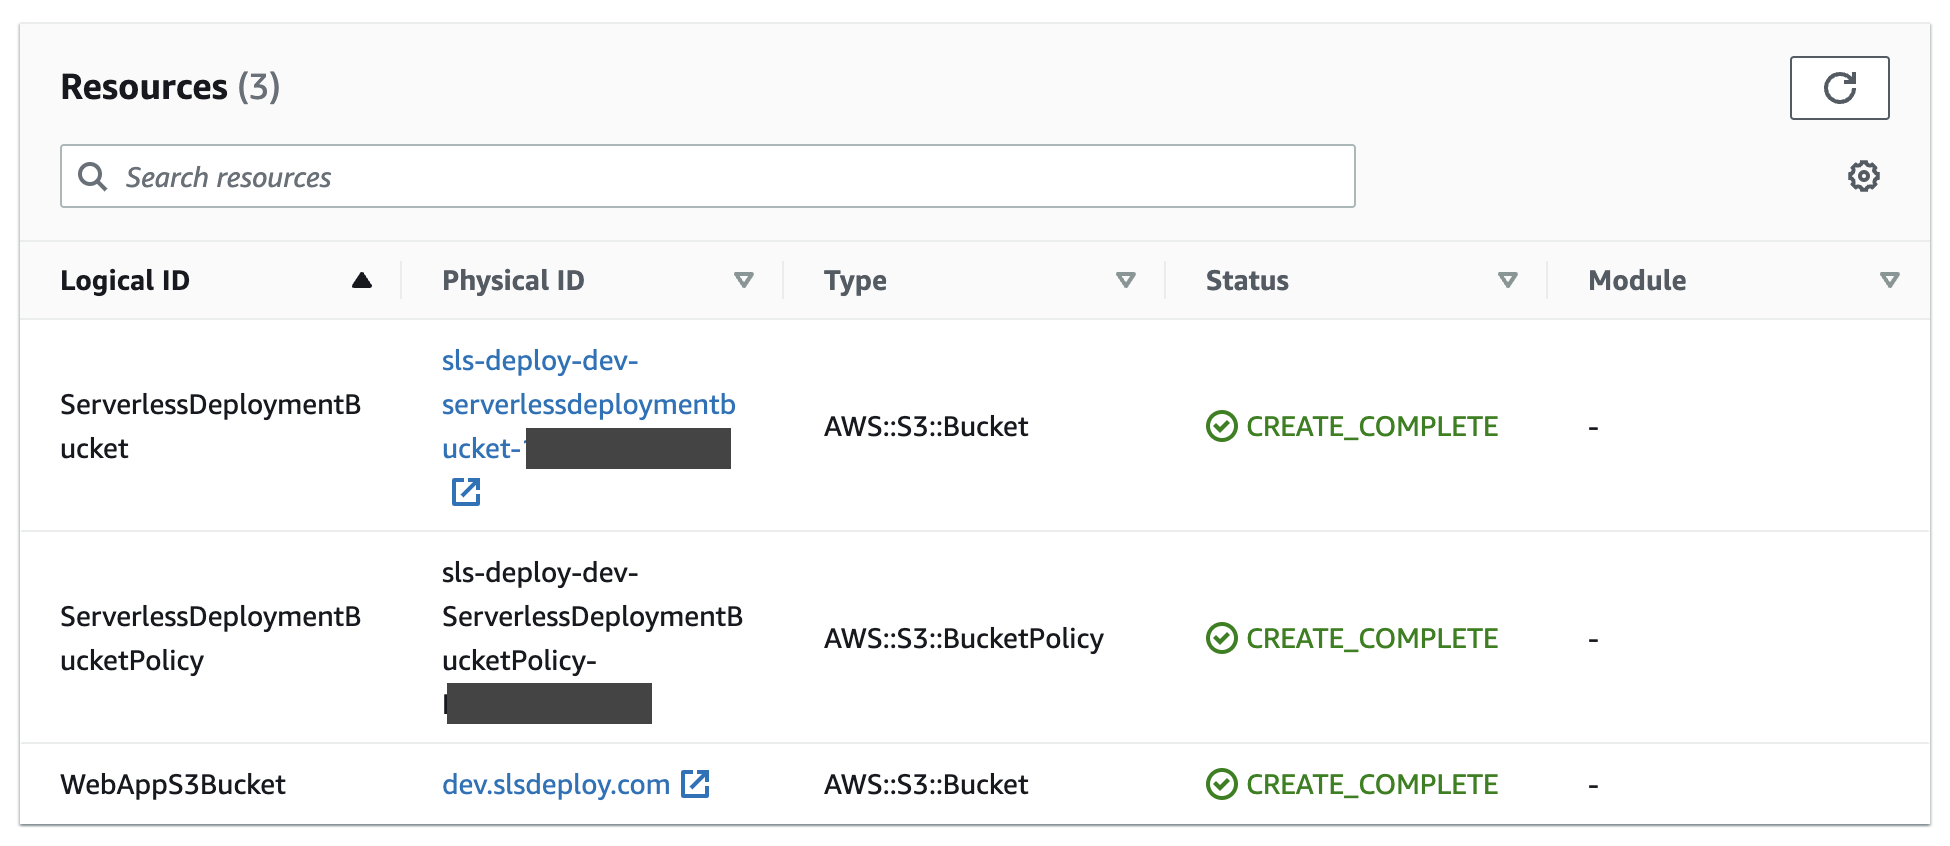
Visit CloudFormation > Stacks to see the newly created stack: 
The Stack provides a list of all resources created and managed within the Resources tab: 
After deployment the infrastructure directory will have the following files:
.
├── .config
│   └── env.json
├── .serverless
│   ├── cloudformation-template-create-stack.json
│   ├── cloudformation-template-update-stack.json
│   └── serverless-state.json
└── serverless.yml
Create the Rest of the Resources
Append the following to the bottom of the serverless.yml file
Origin Access Control
# serverless.yml
    CloudFrontOAC:
      Type: AWS::CloudFront::OriginAccessControl
      Properties:
        OriginAccessControlConfig:
          Description: 'access-identity-${self:custom.s3Bucket}.s3.${AWS::Region}.amazonaws.com'
          Name: ${self:custom.s3Bucket}
          OriginAccessControlOriginType: s3
          SigningBehavior: always
          SigningProtocol: sigv4
Static Files S3 Bucket Policy
Provides access to the CloudFront Distribution by referencing the distribution id (yet to be created)
# serverless.yml
    WebAppS3BucketPolicy:
      Type: AWS::S3::BucketPolicy
      Properties:
        Bucket:
          Ref: WebAppS3Bucket
        PolicyDocument:
          Statement:
            - Sid: AllowCloudFrontServicePrincipal
              Effect: Allow
              Principal:
                Service: 'cloudfront.amazonaws.com'
              Resource: arn:aws:s3:::${self:custom.s3Bucket}/*
              Action: s3:GetObject
              Condition:
                StringEquals:
                  "AWS:SourceArn": !Sub
                      - 'arn:aws:cloudfront::${AWS::AccountId}:distribution/${DistributionId}'
                      - { DistributionId: !Ref WebAppCloudFrontDistribution }
CloudFront Distribution
Creates the distribution by referencing the Origin Access Control policy defined in the template and the existing certificate (id is housed in the .config/env.json file). The aliases are also defined in the env file as the development deployment should only have the dev subdomain, while the production deployment needs to contain the root domain and www subdomain.
# serverless.yml
    WebAppCloudFrontDistribution:
      Type: AWS::CloudFront::Distribution
      Properties:
        DistributionConfig:
          Origins:
            - DomainName: '${self:custom.s3Bucket}.s3.${aws:region}.amazonaws.com'
              Id: WebAppS3Origin
              S3OriginConfig:
                OriginAccessIdentity: ''
              OriginAccessControlId: !GetAtt CloudFrontOAC.Id
          Enabled: 'true'
          Aliases: ${self:custom.aliases}
          DefaultRootObject: index.html
          DefaultCacheBehavior:
            AllowedMethods:
              - GET
              - HEAD
            CachePolicyId: 658327ea-f89d-4fab-a63d-7e88639e58f6 # Id for the AWS managed CachingOptimized policy
            TargetOriginId: WebAppS3Origin
            ForwardedValues:
              QueryString: 'false'
              Cookies:
                Forward: none
            ViewerProtocolPolicy: redirect-to-https
          HttpVersion: http2
          IPV6Enabled: 'true'
          ViewerCertificate:
            AcmCertificateArn: !Sub 'arn:aws:acm:us-east-1:${AWS::AccountId}:certificate/${self:custom.certificateId}'
            MinimumProtocolVersion: TLSv1.2_2021
            SslSupportMethod: sni-only
          CustomErrorResponses:
            - ErrorCode: 403
              ResponseCode: 404
              ResponsePagePath: /404.html
Additional DNS Records
Creates the A and AAAA (required for IPv6) alias records to point the domain to the distribution.
Note: the CNAME needs to be uncommented out for the prod deployment in order to allow provide access to the www subdomain. Otherwise, this can be better handled by manually adding this into the DNS settings via the management console allowing the template to be identical for either prod or dev.
# serverless.yml
    DnsRecordSet:
      Type: AWS::Route53::RecordSetGroup
      Properties:
        HostedZoneName: '${self:custom.hostedZone}.' # Note the trailing '.'
        RecordSets:
        - Name: '${self:custom.domainName}'
          Type: A
          AliasTarget:
            DNSName: !GetAtt WebAppCloudFrontDistribution.DomainName
            HostedZoneId: Z2FDTNDATAQYW2 # Always the hosted zone ID for alias records that routes traffic to a CloudFront distribution
        - Name: '${self:custom.domainName}'
          Type: AAAA
          AliasTarget:
            DNSName: !GetAtt WebAppCloudFrontDistribution.DomainName
            HostedZoneId: Z2FDTNDATAQYW2 # Always the hosted zone ID for alias records that routes traffic to a CloudFront distribution

        # Uncomment for production deployment or configure manually in the Route 53 portal
        # - Name: 'www.${self:custom.domainName}'
        #   Type: CNAME
        #   TTL : "300"
        #   ResourceRecords:
        #     - '${self:custom.domainName}'
Final Deployment
When running the deploy command again, only the new resources are created. Existing resources that have been modified will be updated. It is important to note that changes to the resources from the console may not be picked up when deploying. For example, the web app bucket will not be re-created if deleted from the console. This is because the templates assume that the bucket is still present until a change set is defined to delete the bucket. More on this in Part 3B.
sls deploy --region ap-southeast-2 --stage dev --verbose

Deploying sls-deploy to stage dev (ap-southeast-2)

Packaging
Retrieving CloudFormation stack
Uploading
Uploading CloudFormation file to S3
Uploading State file to S3
Updating CloudFormation stack
Creating new change set
Waiting for new change set to be created
Change Set did not reach desired state, retrying
Executing created change set
  UPDATE_IN_PROGRESS - AWS::CloudFormation::Stack - sls-deploy-dev
  CREATE_IN_PROGRESS - AWS::CloudFront::OriginAccessControl - CloudFrontOAC
  CREATE_IN_PROGRESS - AWS::CloudFront::OriginAccessControl - CloudFrontOAC
  CREATE_COMPLETE - AWS::CloudFront::OriginAccessControl - CloudFrontOAC
  CREATE_IN_PROGRESS - AWS::CloudFront::Distribution - WebAppCloudFrontDistribution
  CREATE_IN_PROGRESS - AWS::CloudFront::Distribution - WebAppCloudFrontDistribution
  CREATE_COMPLETE - AWS::CloudFront::Distribution - WebAppCloudFrontDistribution
  CREATE_IN_PROGRESS - AWS::S3::BucketPolicy - WebAppS3BucketPolicy
  CREATE_IN_PROGRESS - AWS::S3::BucketPolicy - WebAppS3BucketPolicy
  CREATE_IN_PROGRESS - AWS::Route53::RecordSetGroup - DnsRecordSet
  CREATE_COMPLETE - AWS::S3::BucketPolicy - WebAppS3BucketPolicy
  CREATE_IN_PROGRESS - AWS::Route53::RecordSetGroup - DnsRecordSet
  CREATE_COMPLETE - AWS::Route53::RecordSetGroup - DnsRecordSet
  UPDATE_COMPLETE_CLEANUP_IN_PROGRESS - AWS::CloudFormation::Stack - sls-deploy-dev
  UPDATE_COMPLETE - AWS::CloudFormation::Stack - sls-deploy-dev
Retrieving CloudFormation stack
Removing old service artifacts from S3

✔ Service deployed to stack sls-deploy-dev (253s)


Stack Outputs:
  ServerlessDeploymentBucketName: sls-deploy-dev-serverlessdeploymentbucket-UNIQUE_IDENTIFIER
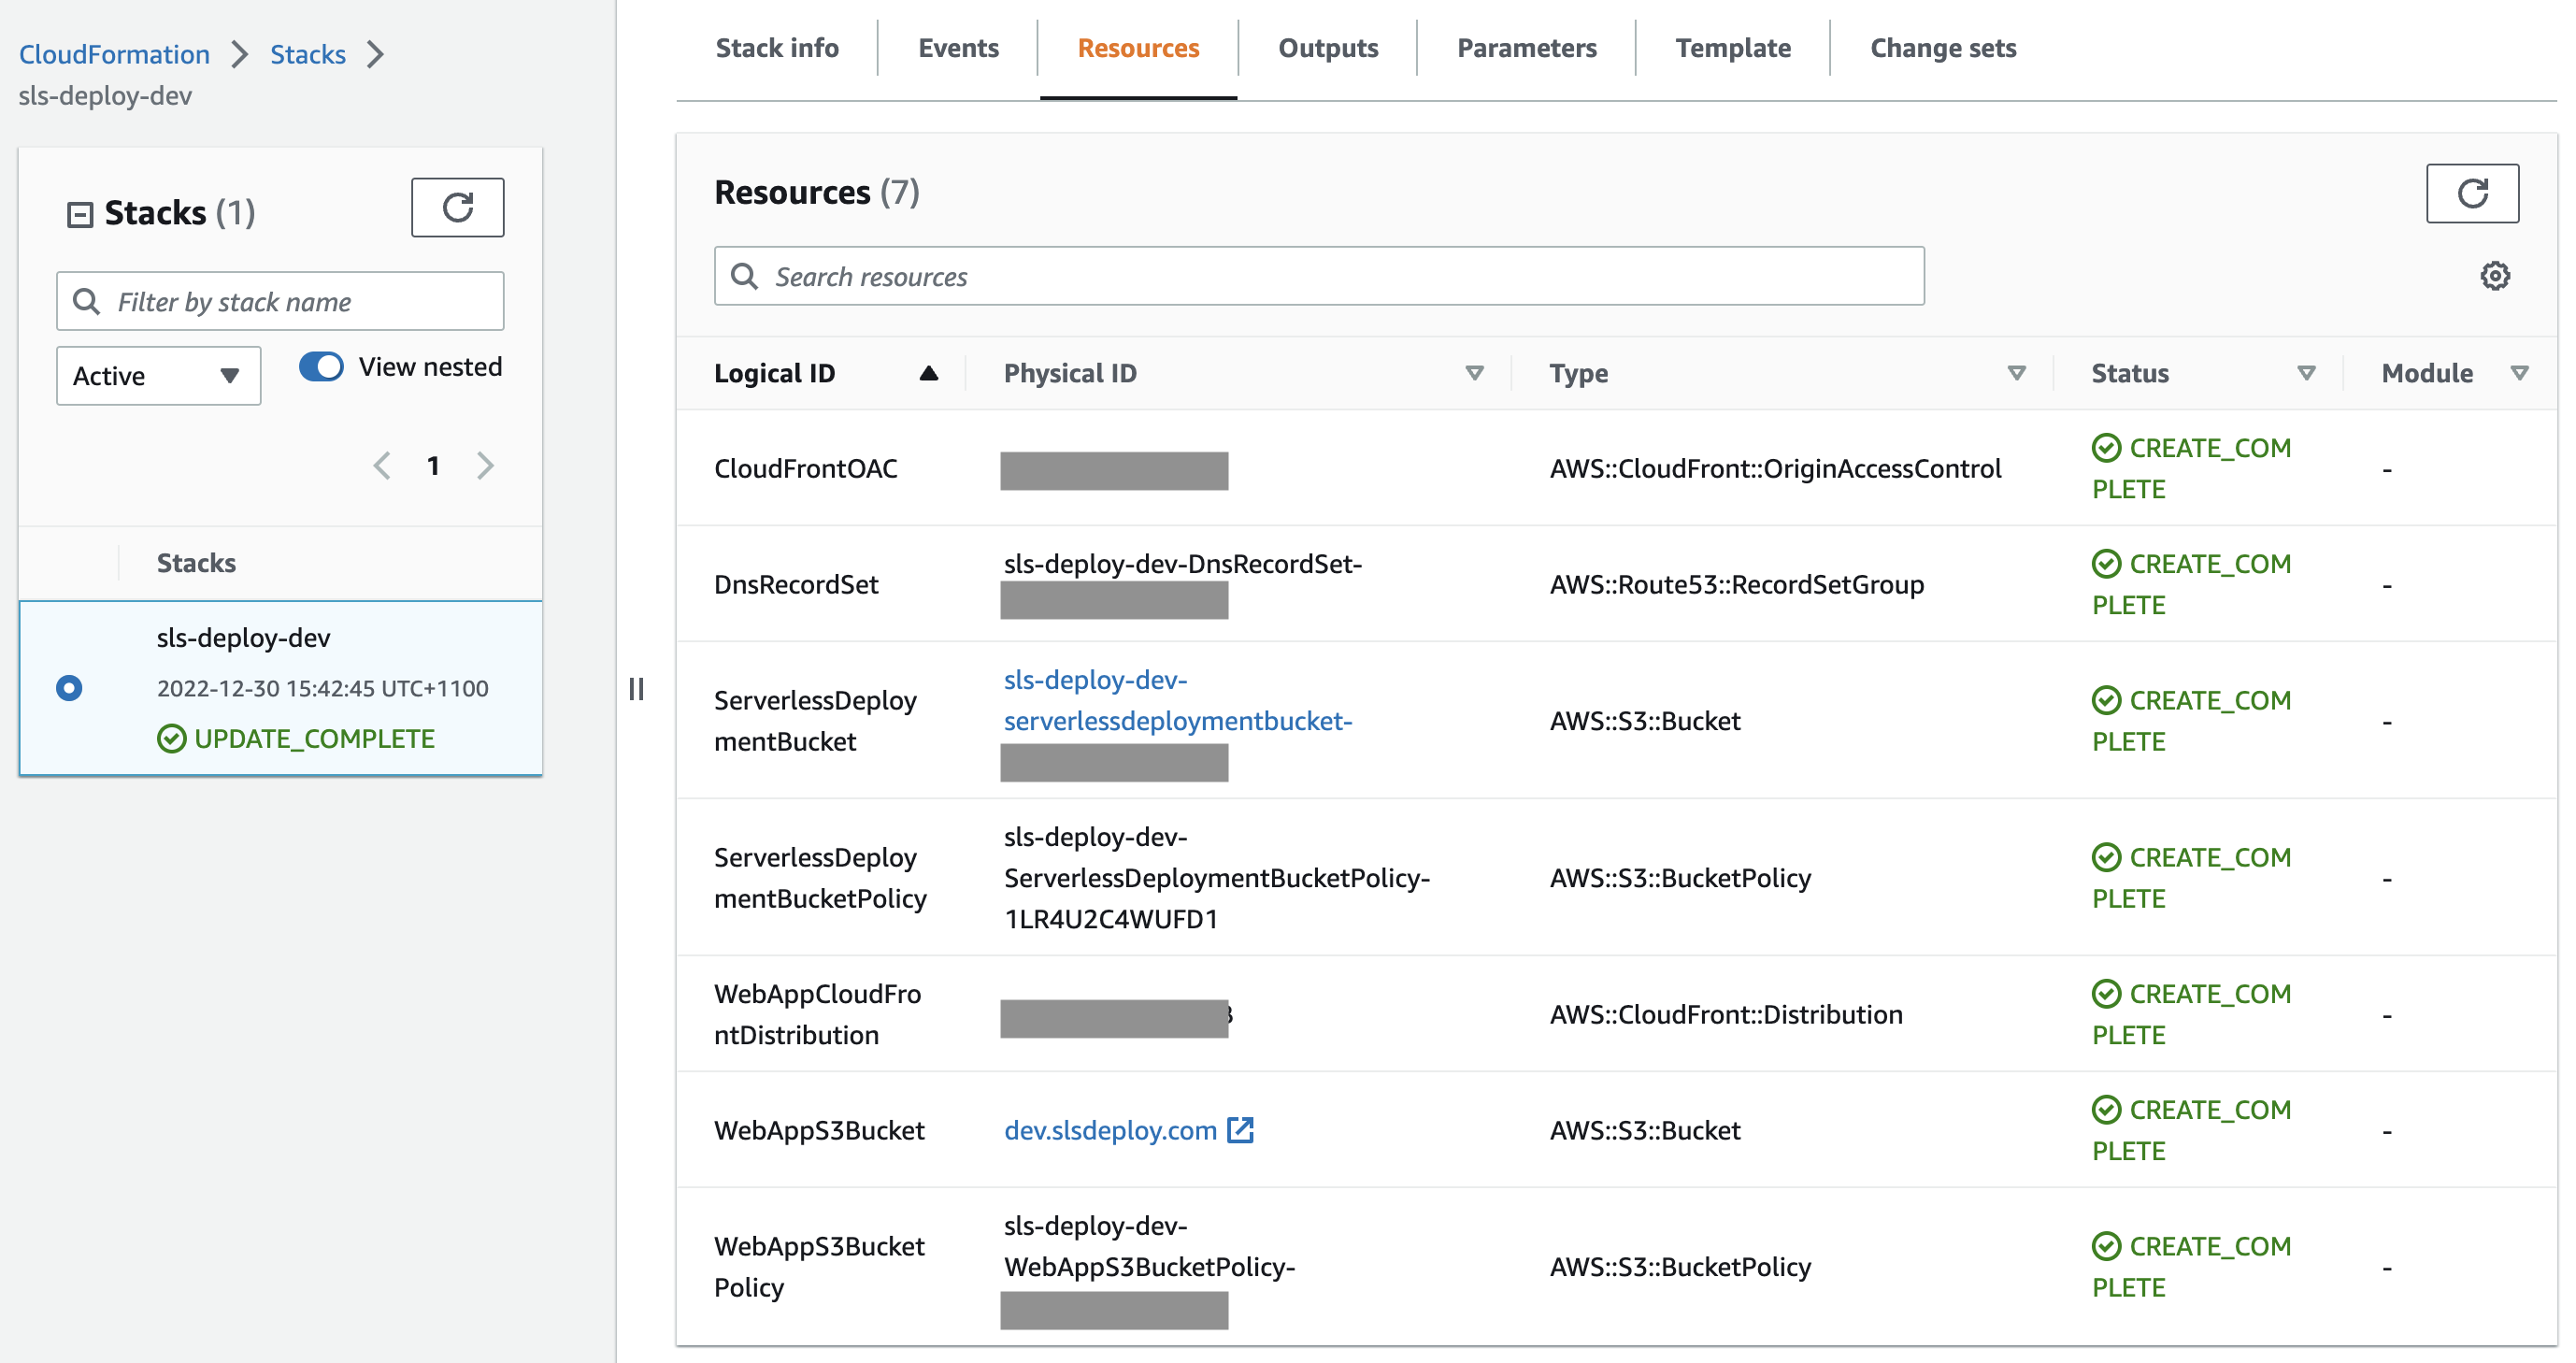
The final resources will look something like this: 
Copy Web App to S3 Bucket
Our static file bucket is currently empty. Attempting to access the custom domain or CloudFront domain will result in an Access Denied error. This is because there is no index.html file to route to (this is specified in the DefaultRootObject property of the CloudFront distribution).aws s3 sync path/to/front-end/out s3://dev.example.com
The site should now be live and accessible at the domain and sub domains specified
TLDR
A quick summary of the steps to deploy your static blog:
- Create your repo
- Create
serverless.ymlfile and collect the code from the code snippets labeledserverless.yaml - [Optional] Uncomment
CNAMEDNS Record Set for production - Create the
.config/env.jsonfile and replace the fields - Deploy with
sls deploy --region REGION --stage STAGE --verbose- Replace REGION with target region (eg
us-east-1) - Replace STAGE with either dev or prod
- Replace REGION with target region (eg
- Copy static contents to web app bucket. Can do via AWS Management Console via CLI
aws s3 sync out s3://BUCKET_NAME- Replace BUCKET_NAME with WebApp bucket name (eg
s3://example.com)
What's next?
This post focused creating new resources for our infrastructure. Part 3B handles the failures that occur when trying to create a stack when a resource already exists outside of the stack. Go to Part 3B to explore importing existing resources into a CloudFormation stack.
In future posts, we will explore deployment pipelines for both our AWS infrastructure as well as our front-end resources.