- Published on
Serve Website via Content Distribution Network
Part 2 of "Deploy Static Website To AWS"
Table of Contents
- Overview
- The Goal
- Pre-Requisites
- Configuring Route 53 + CloudFront Domain
- Create A Distribution
- [Option 1 - Recommended] CloudFront Distribution for S3 REST API Endpoints
- [Option 2] CloudFront Distribution for S3 Website Endpoints
- Request a Certificate
- Certificate Settings
- [Troubleshooting]: Incorrectly configured Hosted Zone settings
- Validate your certificate
- Complete CloudFront Distribution Record
- Re-Route domain from S3 Endpoint to CloudFront
- [Troubleshooting]: 403 Accessing Sub-Domains
- [Troubleshooting]: The Latest Changes from S3 Arn't Being Displayed
- What's Next
Overview
The Goal
The previous post focused on manually configuring and copying our content into an S3 bucket and using an S3 website endpoint to serve our content. 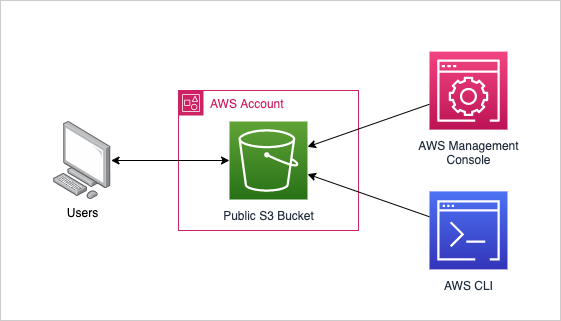
This post will focus on a more robust method of delivering the site to the end users. By leveraging the AWS CloudFront CDN, public access can be restricted to the S3 bucket ensuring that all users are funnelled from the Route 53 domain to S3. In order to provide HTTPS, the CloudFront distribution must be configured with an SSL certificate, which is surprisingly easy (and free) to set up. In addition to providing HTTPS access, CloudFront can also handle caching and other distribution logic to better control and more optimally serve content to the end user.
In the below example, the user makes a request to the domain, which routes traffic to the CloudFront distribution. The distribution will attempt to serve content from its cached stores however, if the requested content doesn't exist in the stores or has expired, the content is requested from the S3 bucket and the content is updated added / updated in the cache. The content is still being copied directly from to the S3 bucket via the CLI or Management Console. 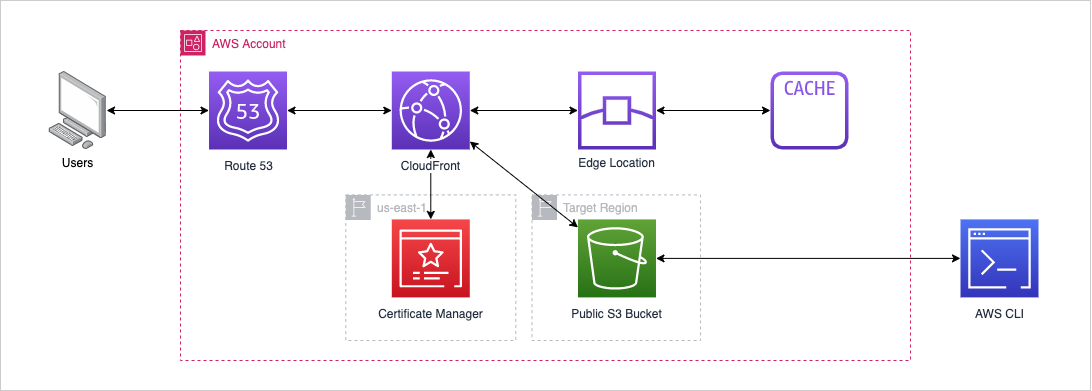
Pre-Requisites
- An AWS account
- AWS CLI installed and configured
- A Registered Domain Name (either in AWS account or a configured Hosted Zone)
- S3 bucket
- Bucket name is the same as the domain name
- Private or public bucket.
- Static files deployed to S3
Configuring Route 53 + CloudFront Domain
Create A Distribution
Depending on the S3 endpoint type (either REST or a website endpoint), these settings may be different.
S3 REST API endpoints are provided by the S3 bucket without additional configuration. The REST API endpoint is can be selected from the dropdown in the configuration menu. It follows the below format:
S3 Website endpoints are provided by configuring the bucket's static website hosting permissions (in the properties menu). S3 REST API endpoints conform to the below formats (Note the s3-website):
Important differences between the endpoint types:
- SSL not available for S3 website endpoints
- XML vs HTTP response format
- Responses to GET and HEAD returns are different
- S3 REST API returns the list of the object key (the default root object needs to be configured to point to
index.html) - S3 website endpoint returns the index document (
index.htmlin our case)
- S3 REST API returns the list of the object key (the default root object needs to be configured to point to
- Origin Access Identity (OAI) and Origin Access Control (OAC) not available for S3 website endpoints. These are used to limit access to the S3 bucket based on the origin of the request
- See this link for a comparison the full comparison
Once the distribution is created, an endpoint for the distribution will be provided. The endpoint will be in the format <UNIQUE_IDENTIFIER>.cloudfront.net and will provide HTTP only connection to the S3 bucket. Note: an Access Denied error will occur if the bucket is empty. Copy the static front-end files.
[Option 1 - Recommended] CloudFront Distribution for S3 REST API Endpoints
Unlike Option 2's method (below) and the bucket steps from Part 1, this option doesn't require a public bucket or a static endpoint configured for S3. 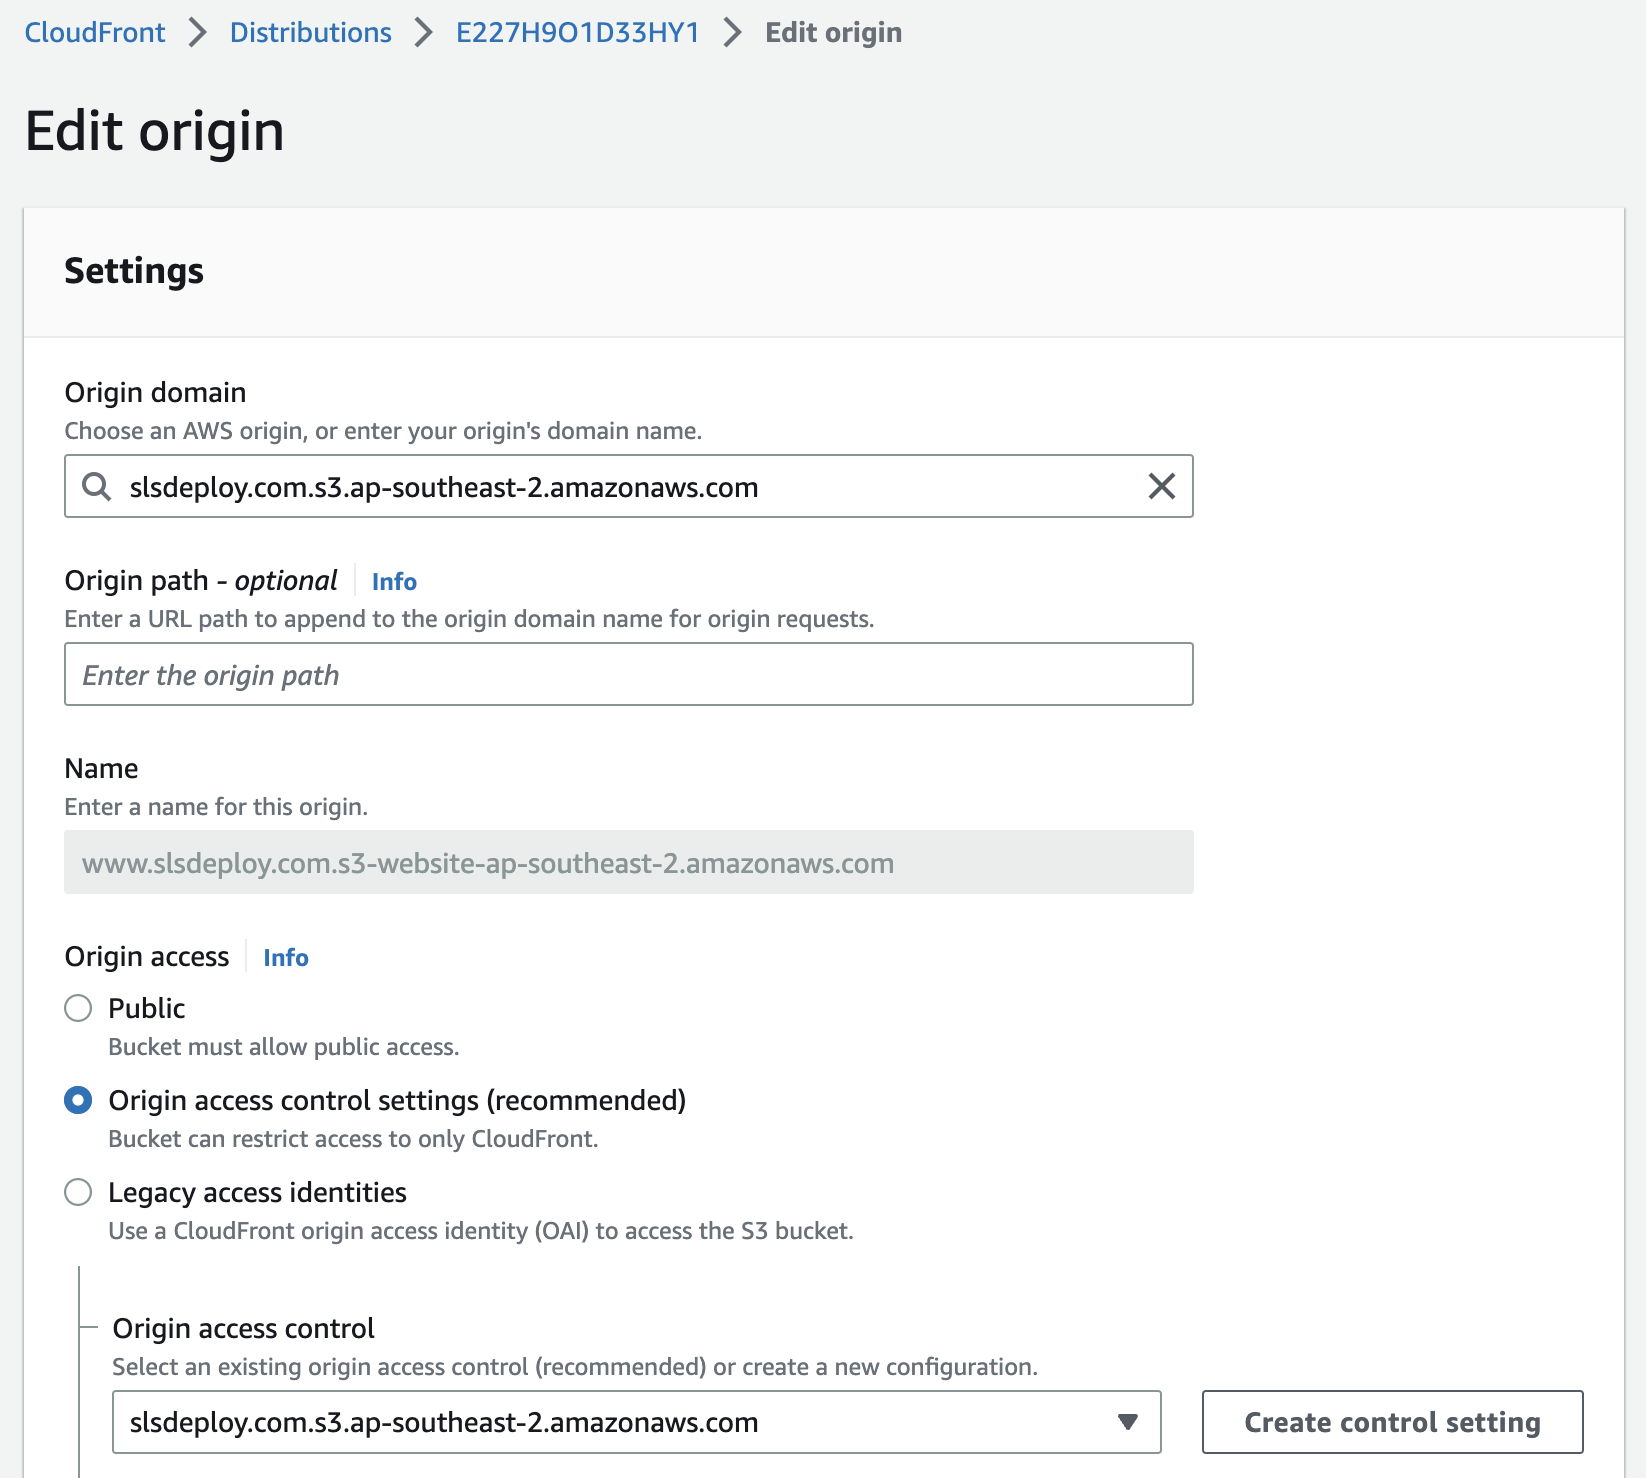
CloudFront Distribution Settings for S3 REST Endpoints
| Field | Value |
|---|---|
| Origin domain | example.com.s3.ap-southeast-2.amazonaws.com |
| Name | LOGICAL_NAME |
| Origin access | Origin access control settings (recommended) |
| Origin access control | Select from list or create |
| Viewer protocol policy | Redirect HTTP to HTTPS |
| Cache key and origin requests | Cache policy and origin request policy (recommended) |
| Cache policy | CachingOptimized |
| Alternate domain name (CNAME) - optional | Add all domains and subdomains here: www.example.com, *.example.com |
| Custom SSL certificate - optional | If certificate exists, add this. Otherwise, the distribution settings will need to be added later |
| Default root object - optional | index.html |
| IPv6 | On |
As directed, copy the bucket policy to S3.  The policy entire bucket policy should look something like the below.
{
    "Version": "2008-10-17",
    "Id": "PolicyForCloudFrontPrivateContent",
    "Statement": [
        {
            "Sid": "AllowCloudFrontServicePrincipal",
            "Effect": "Allow",
            "Principal": {
                "Service": "cloudfront.amazonaws.com"
            },
            "Action": "s3:GetObject",
            "Resource": "arn:aws:s3:::example.com/*",
            "Condition": {
                "StringEquals": {
                    "AWS:SourceArn": "arn:aws:cloudfront::<ACCOUNT_ID>:distribution/<DISTRIBUTION_ID>"
                }
            }
        }
    ]
}
If following from part 1, or your bucket is public. Access to your bucket can be restricted. ~S3 Block Public Access
[Option 2] CloudFront Distribution for S3 Website Endpoints
When following on from Part 1, this method doesn't require much additional configuration, however requires a public S3 bucket. Alternatively, access to the S3 bucket can be restricted by calls which contain a predefined secret in the header (not explored in this post). This secret is added by CloudFront and validated by the S3 bucket. 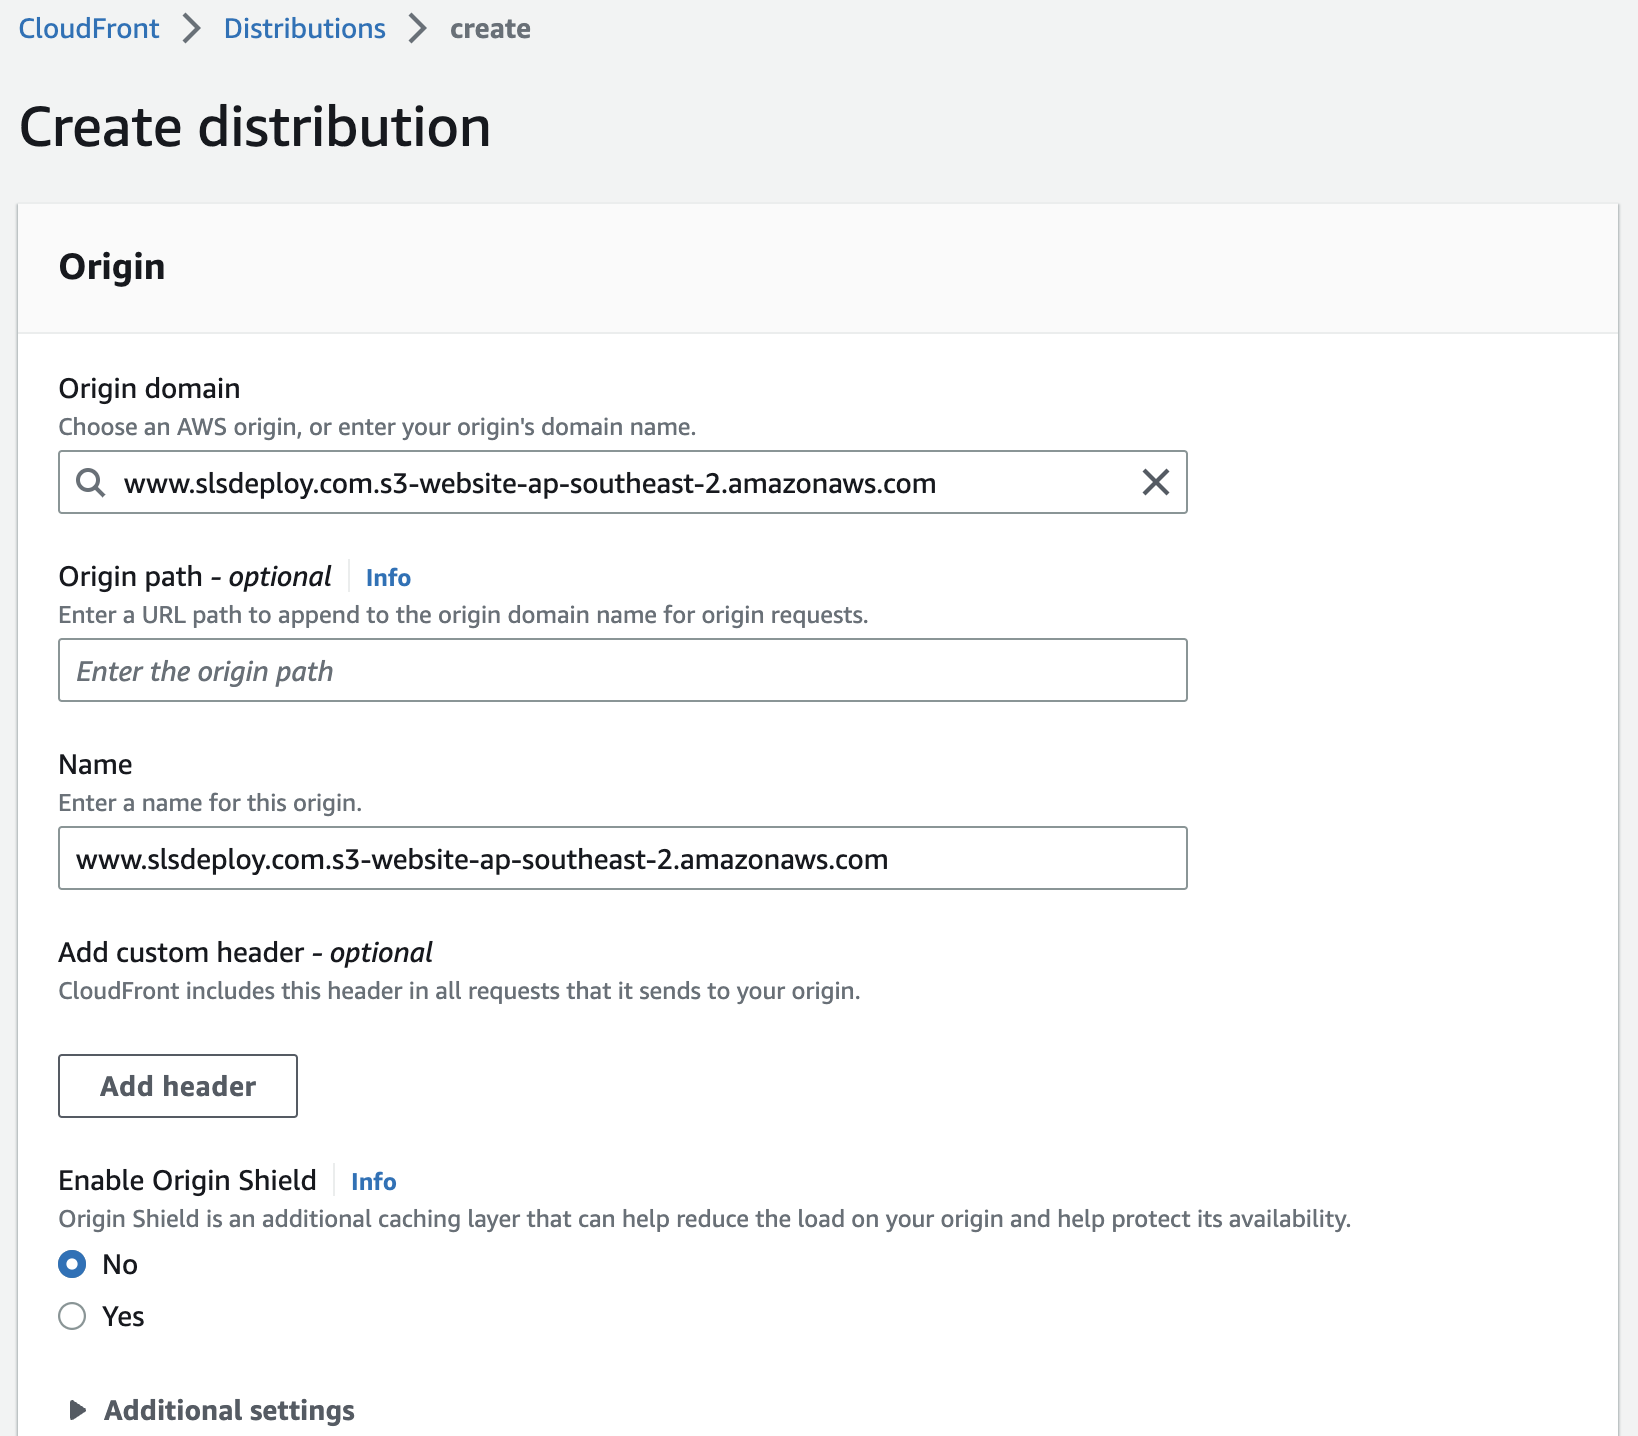
CloudFront Distribution Settings for S3 Website Endpoints
| Field | Value |
|---|---|
| Origin domain | http://www.example.com.s3-website-ap-southeast-2.amazonaws.com |
| Name | LOGICAL_NAME |
| Viewer protocol policy | Redirect HTTP to HTTPS |
| Cache key and origin requests | Cache policy and origin request policy (recommended) |
| Cache policy | CachingOptimized |
| Alternate domain name (CNAME) - optional | Add all domains and subdomains here: www.example.com, *.example.com |
| IPv6 | On |
It is important to ensure that the bucket endpoint is exactly the same as the entered/selected in the origin fields. When using the S3 Website Endpoint, the endpoint will not match the selected entry and as a result will create a "Custom Origin" record instead of an S3 origin. This means that OAI or OAC validation will not be available to limit access of the S3 bucket to only the CloudFront distribution. We will leave the bucket's access as public instead of configuring the header validation method.
Once the distribution is deployed, visiting the CloudFront endpoint will return the static site via the S3 endpoint or CloudFront cache if already loaded.
Note: The CloudFront distribution could take up to 20 minutes to fully deploy.
Request a Certificate
Note: The certificate needs to be created in us-east-1. As per this documentation, "ACM certificates in this region that are associated with a CloudFront distribution are distributed to all the geographic locations configured for that distribution". In order to add an alternate domain name (CNAME) to a CloudFront distribution, a trusted certificate that validates your authorization to use the domain name. Navigate to the AWS Certificate Manager console pane to create a new certificate.
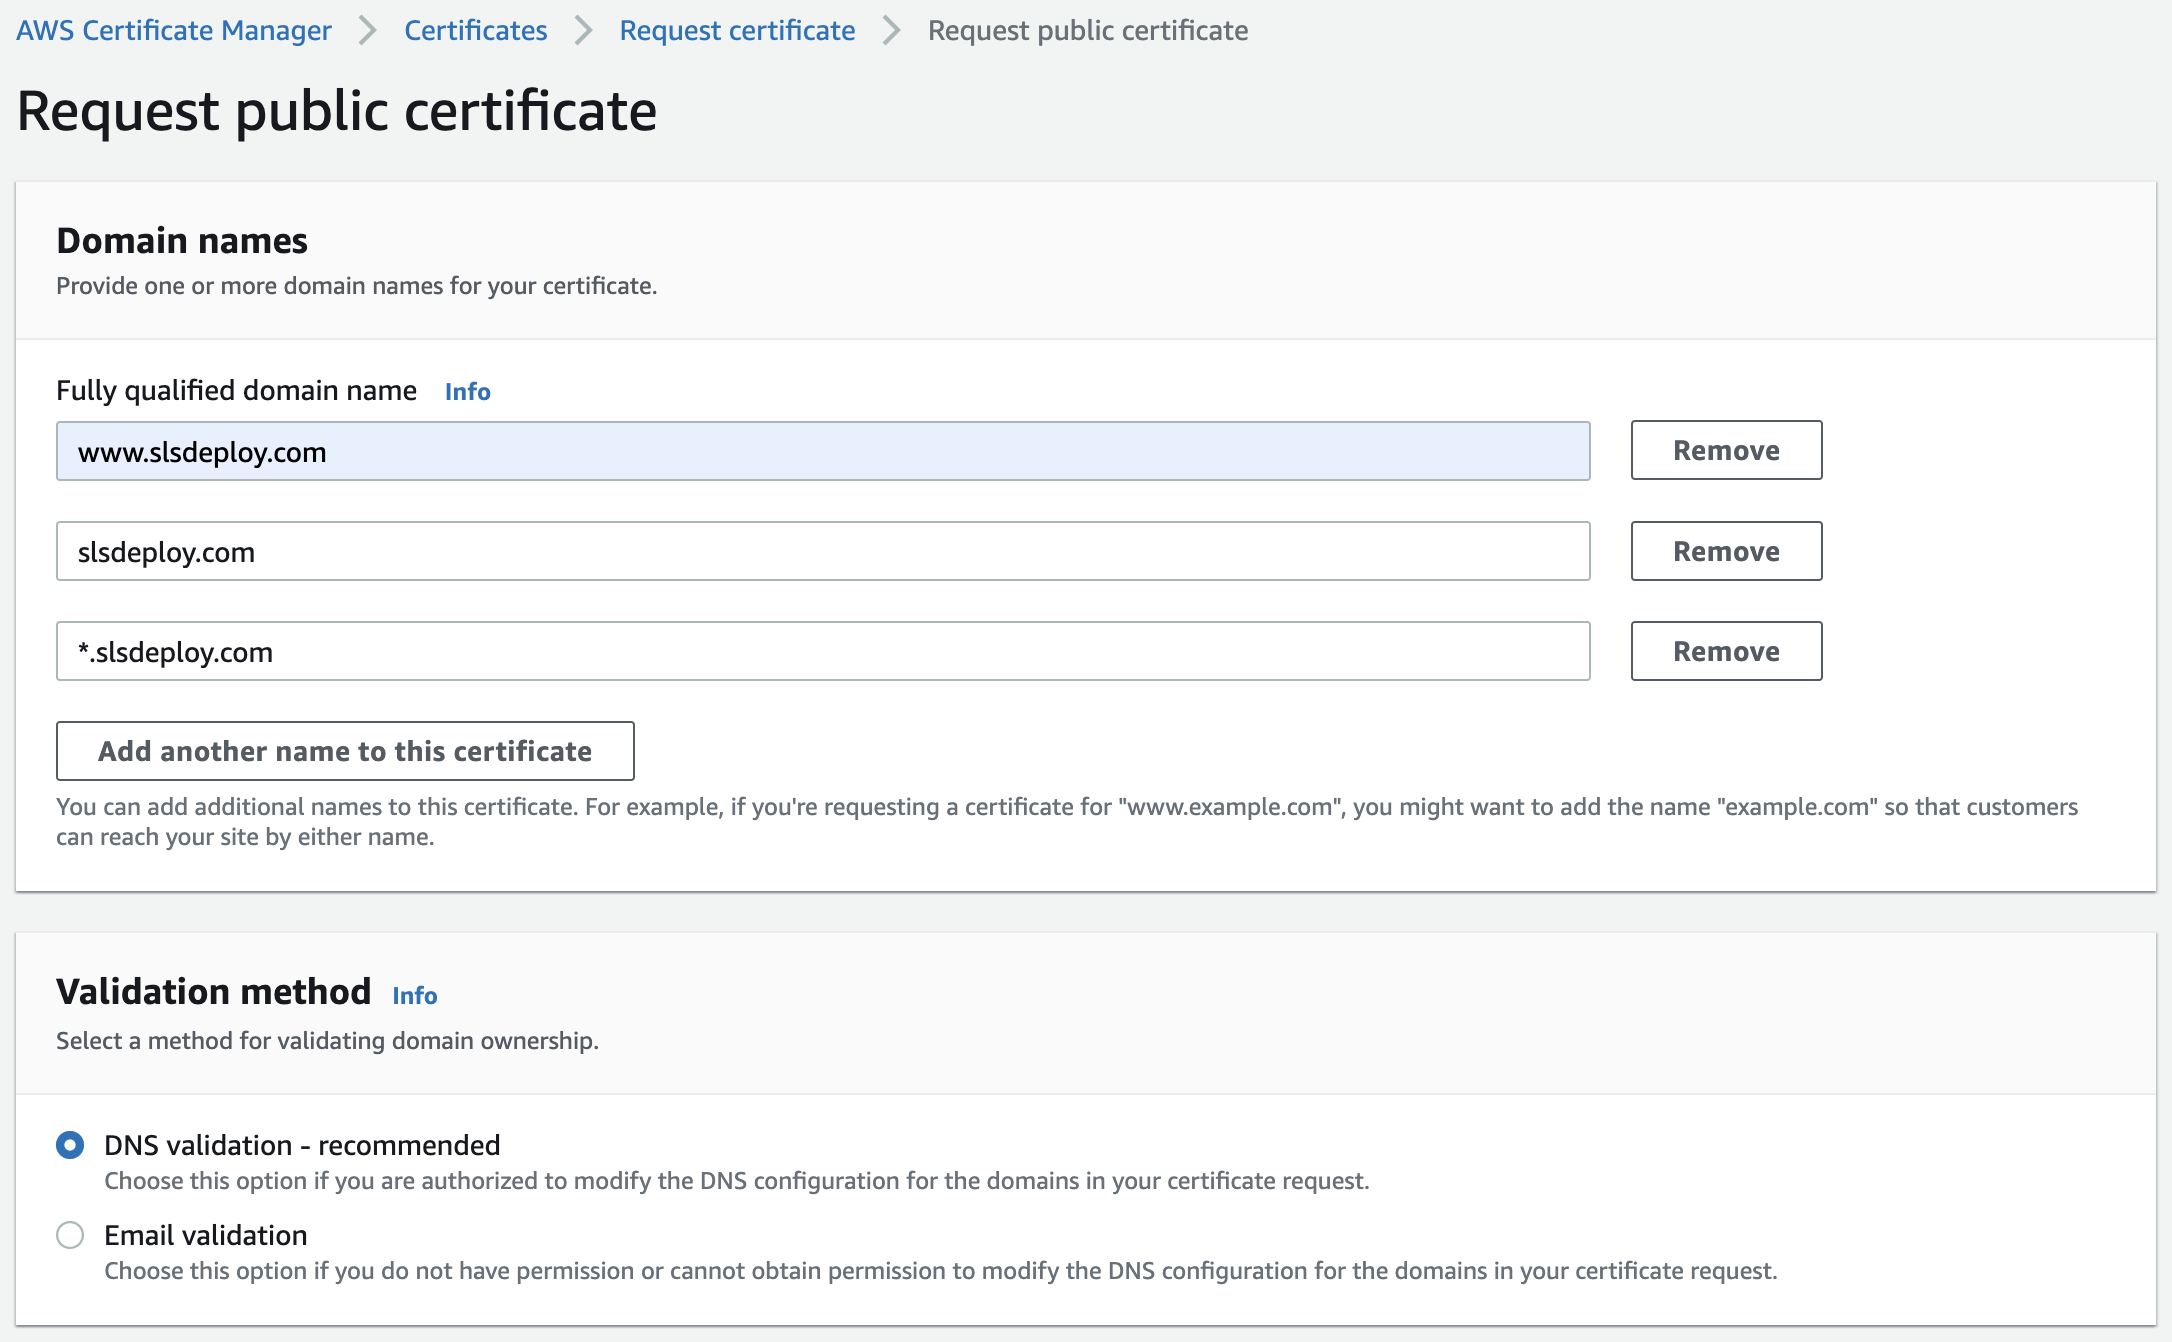
Certificate Settings
| Field | Value |
|---|---|
| Domain Names | Add all fully qualified domain names (FQDN) that this certificate is to cater to. www.example.com, example.com, *.example.com, etc. More info and examples of FQDNs can be found here |
| Validation Method | DNS Validation (recommended and covers renewal) |
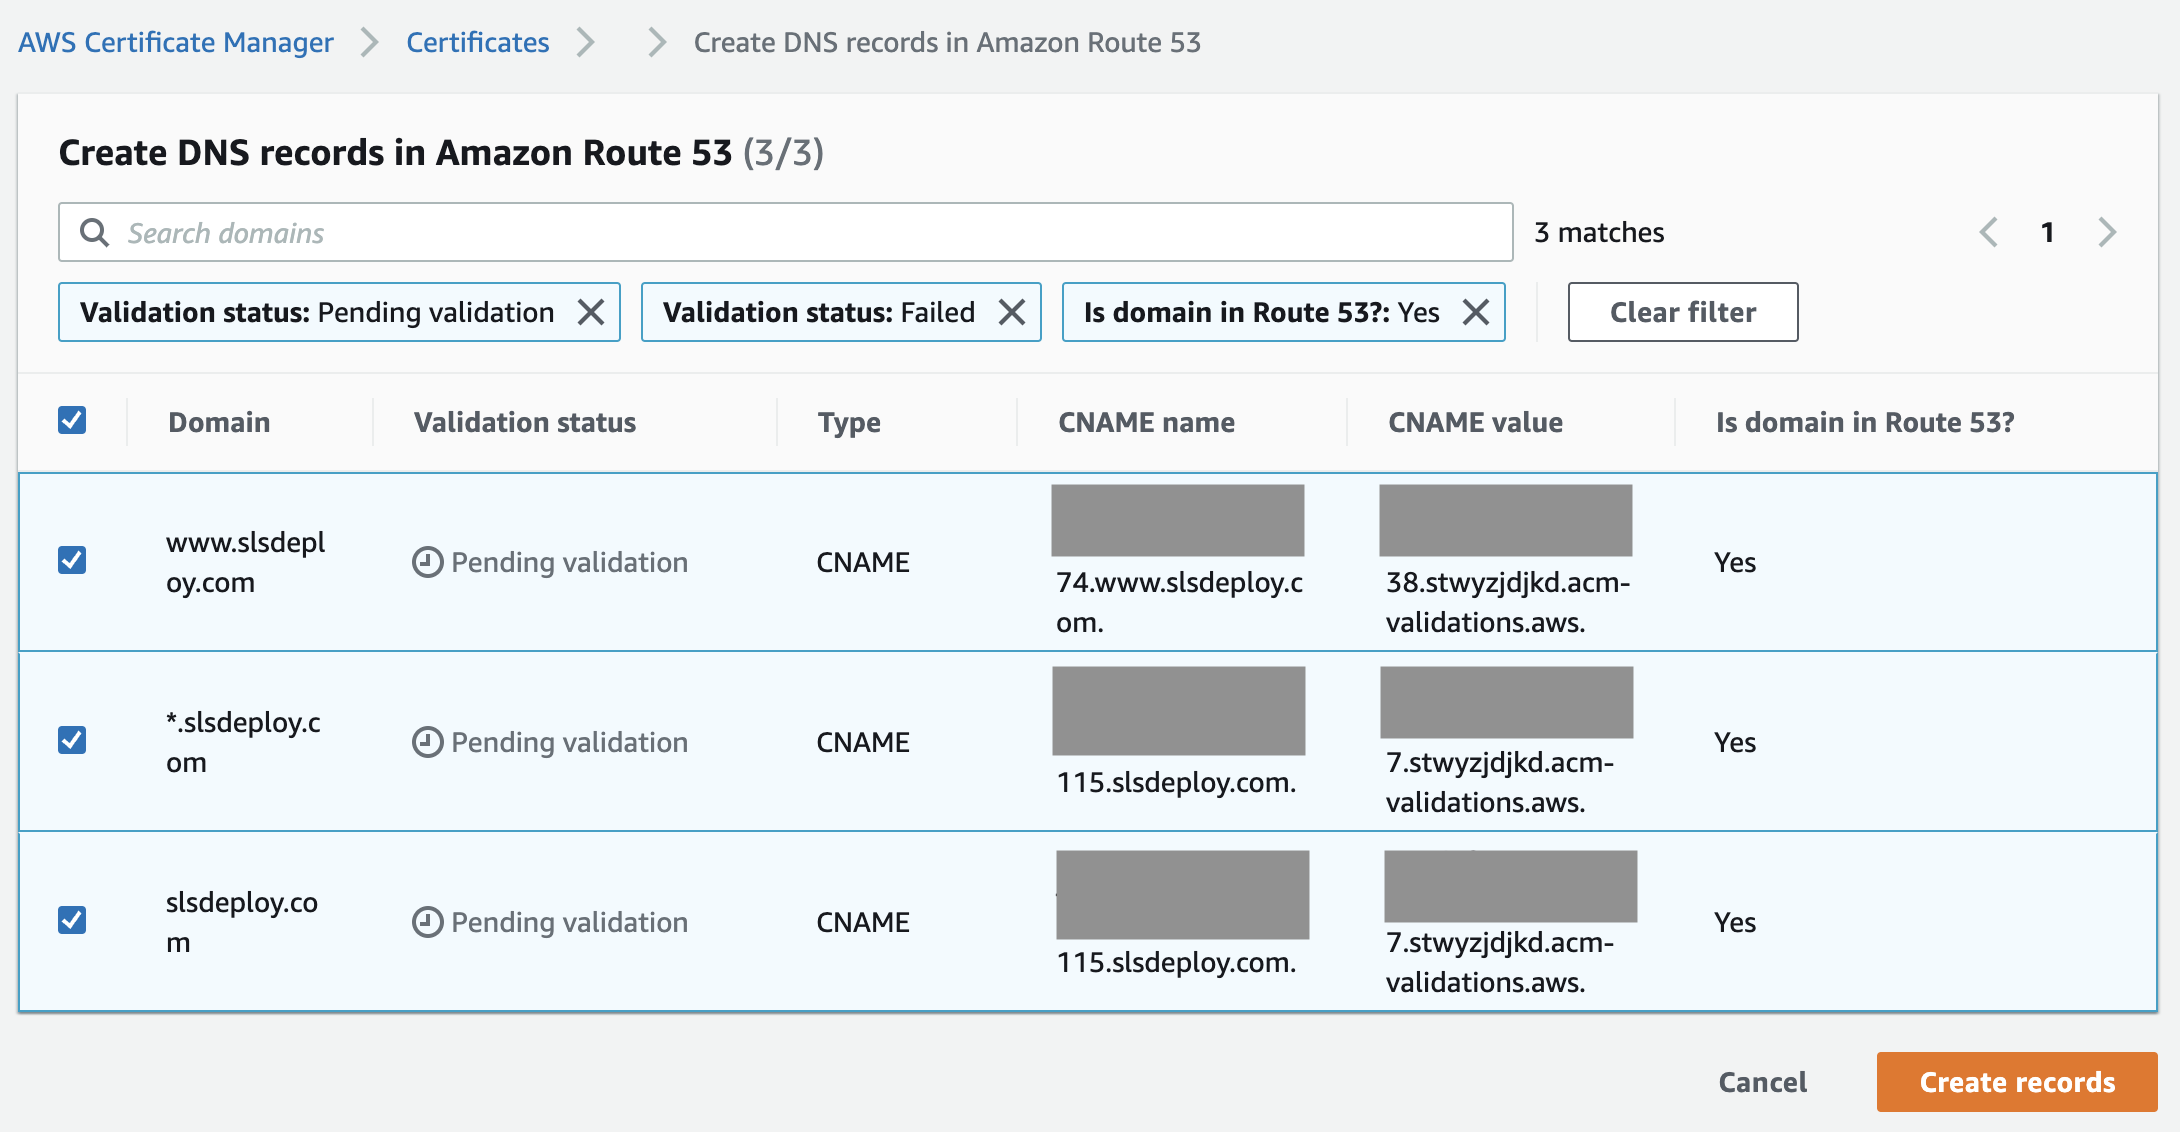
Note: In this example, two different CNAMEs are created to cover the all three FQDNs as *.example.com and example.com use the same CNAME.
[Troubleshooting]: Incorrectly configured Hosted Zone settings
Double check that the Hosted Zone configuration is correctly configured. The NS record of the Domain should match those in the Hosted Zone. If for some reason the hosted zone NS records are different to the domains NS records (maybe edited or deleted and re-added), update the domains NS records to match as per this documentation.
Important: The Hosted Zone NS and SOA records should not (under most circumstances) be edited.
Validate your certificate
In order to tie your certificate to the distribution and access the domain, the certificate routing needs to be added to Route 53. This can be done from the CloudFront distribution's pane. 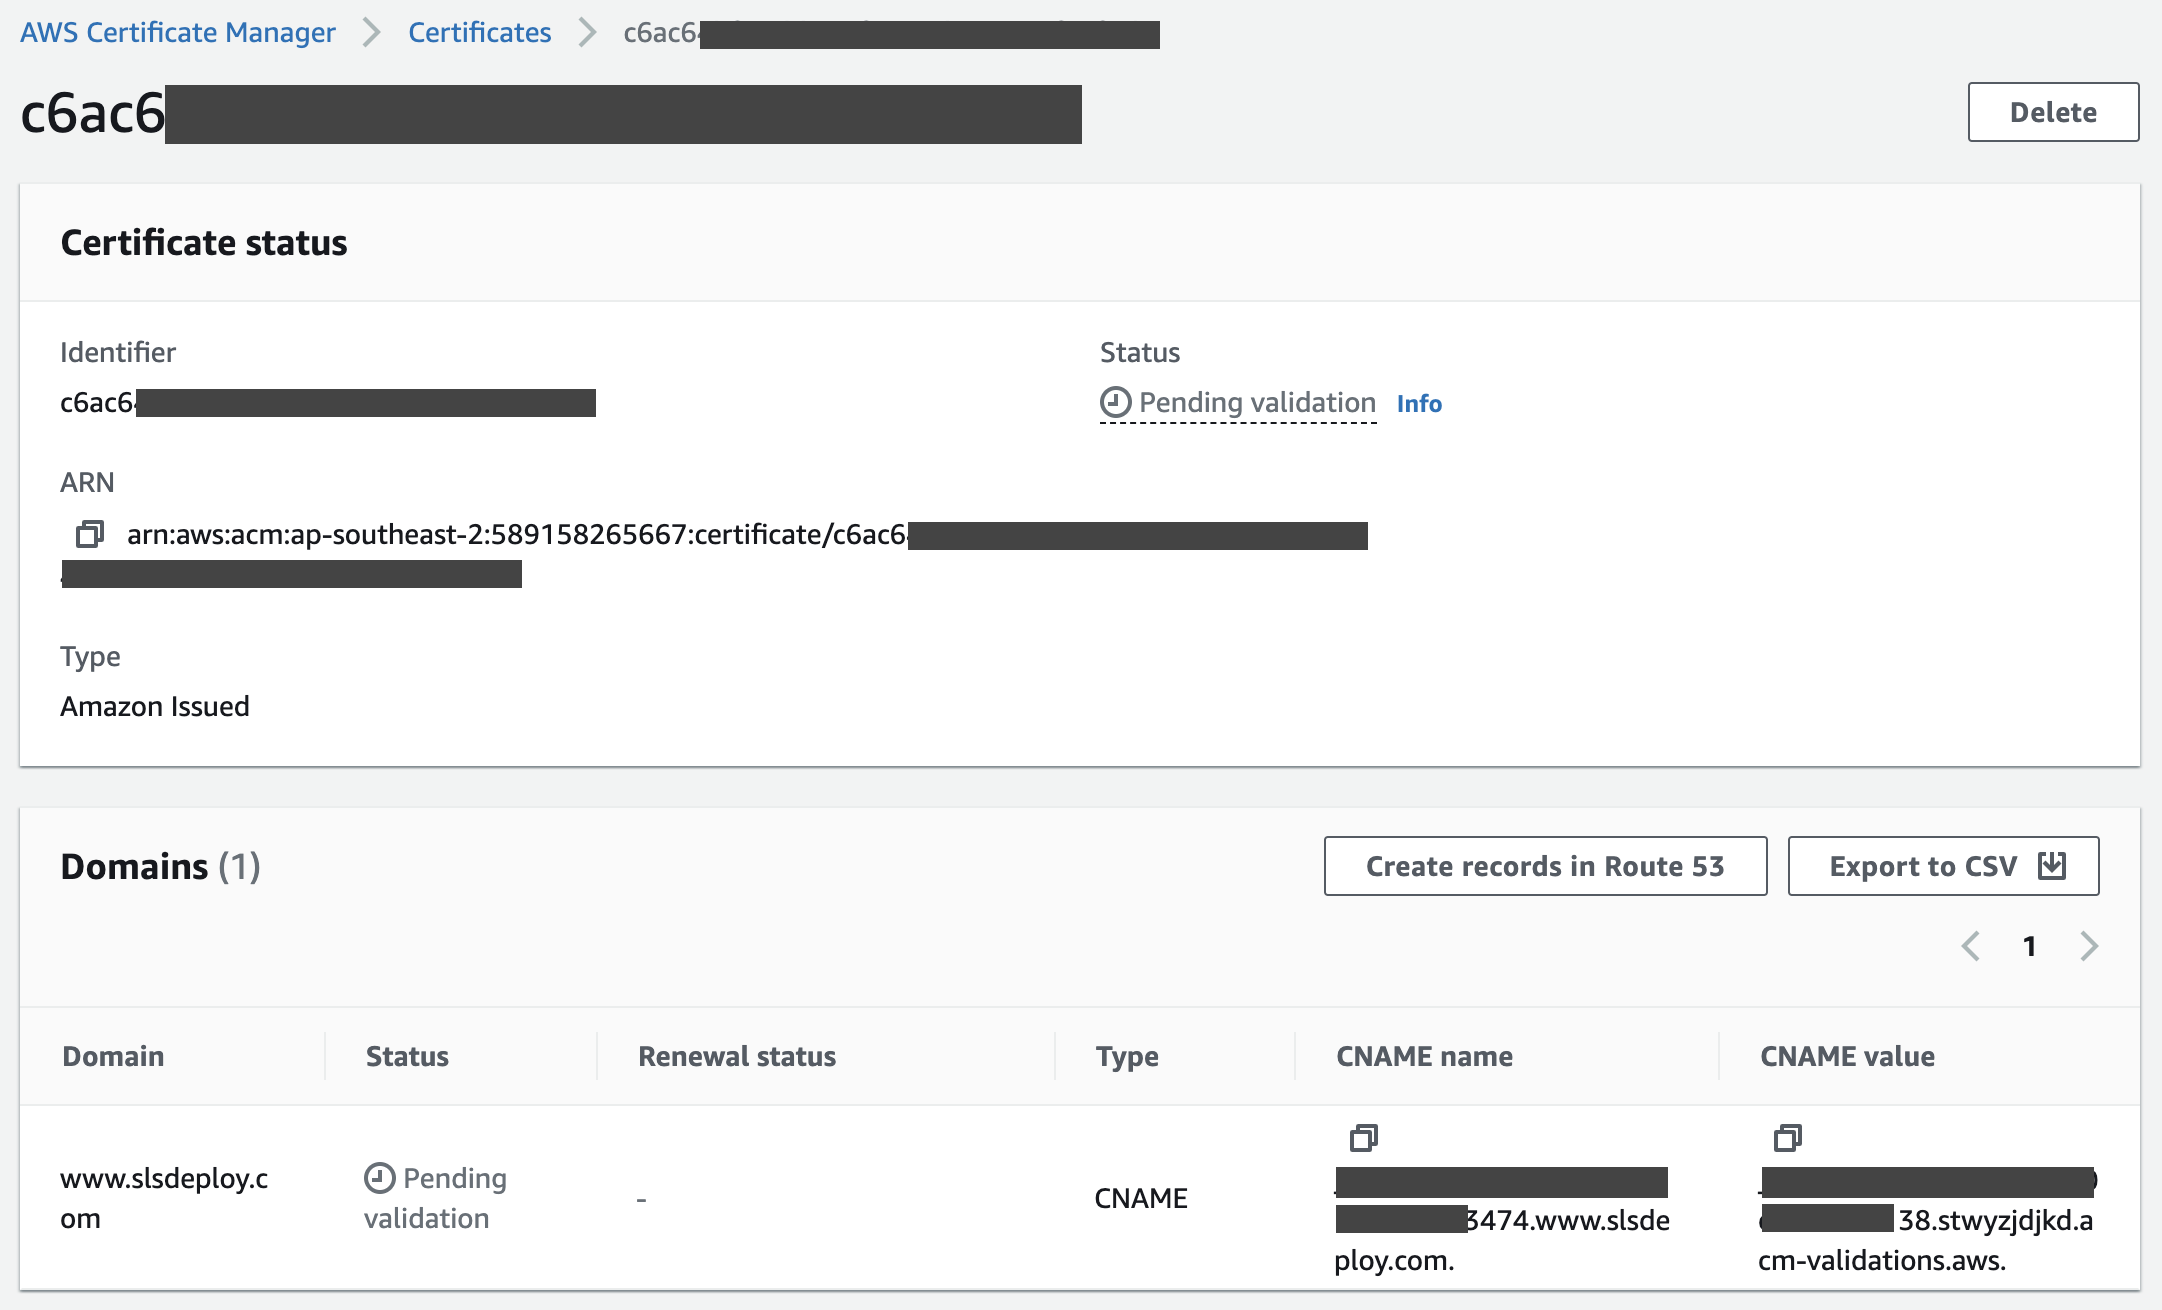
Select the certificate and choose "Create a Record in Route 53" to add certificate's CNAME to the DNS record.
Note: It can take some time for the certificate to be verified. See this link for more information about validating your certificate.  Add the records:
Complete CloudFront Distribution Record
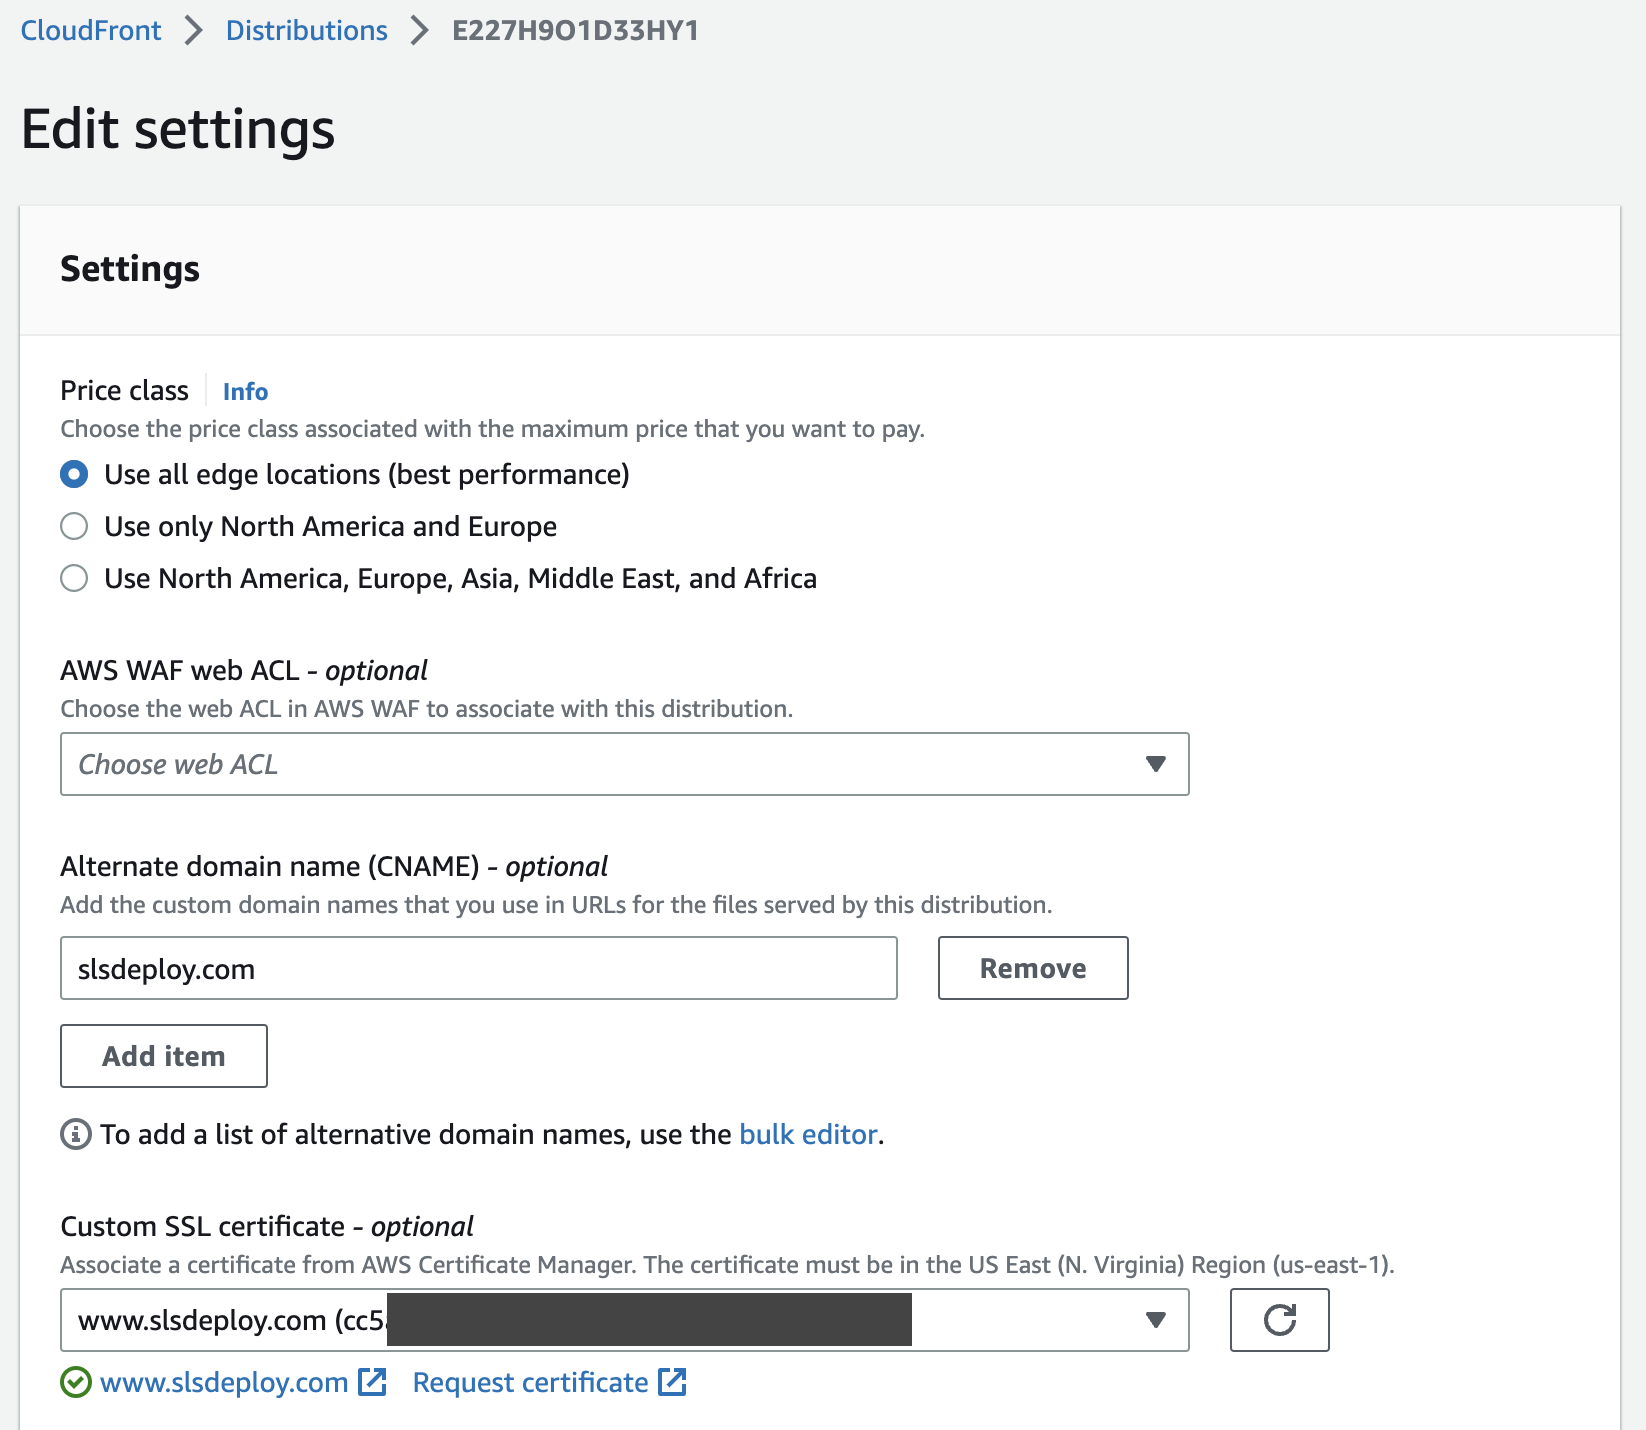
Edit the CloudFront distribution with the following settings:
- If not already done, add the certificate
- Ensure all alternate domains and subdomains here:
www.example.com,*.example.com,example.com
Re-Route domain from S3 Endpoint to CloudFront
For IPv6 enabled distributions, both A and AAAA records needs to be created in order to successfully connect. Without both routing records, connecting to the domain will most likely result in an DNS_PROBE_FINISHED_NXDOMAIN error. IPv6 is enabled in the general settings tab of your CloudFront distribution.
Create an A [and AAAA] route DNS record from the hosted zone: 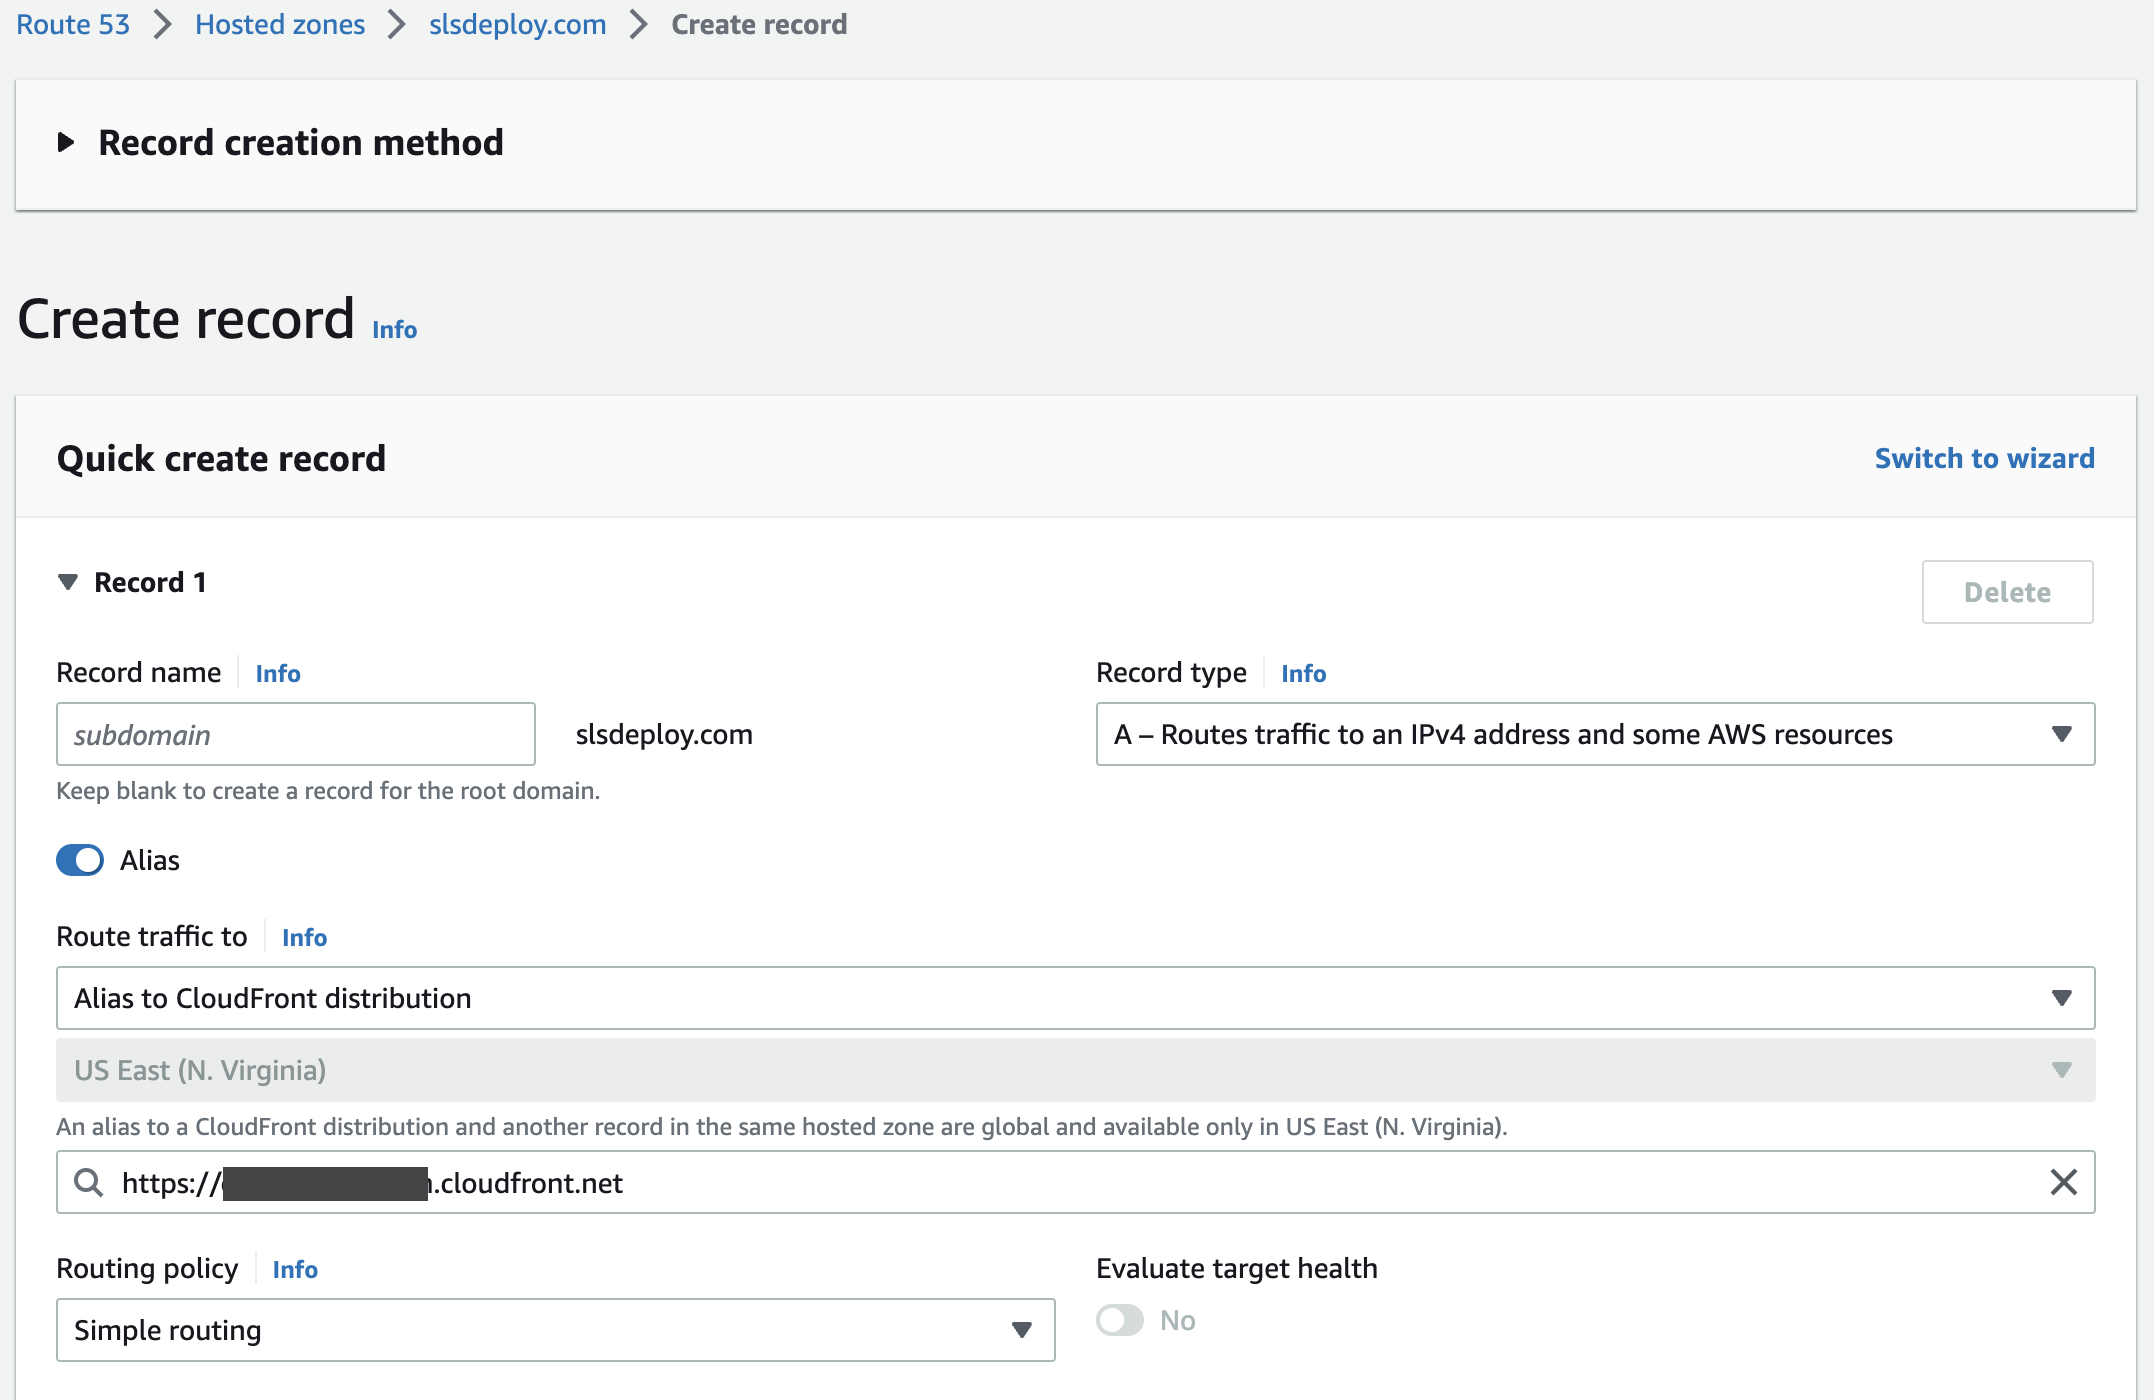
Create CNAMEs for all subdomains to point to your website:
www.example.com->example.com*.example.com->example.com
The final DNS records list will look something like this: 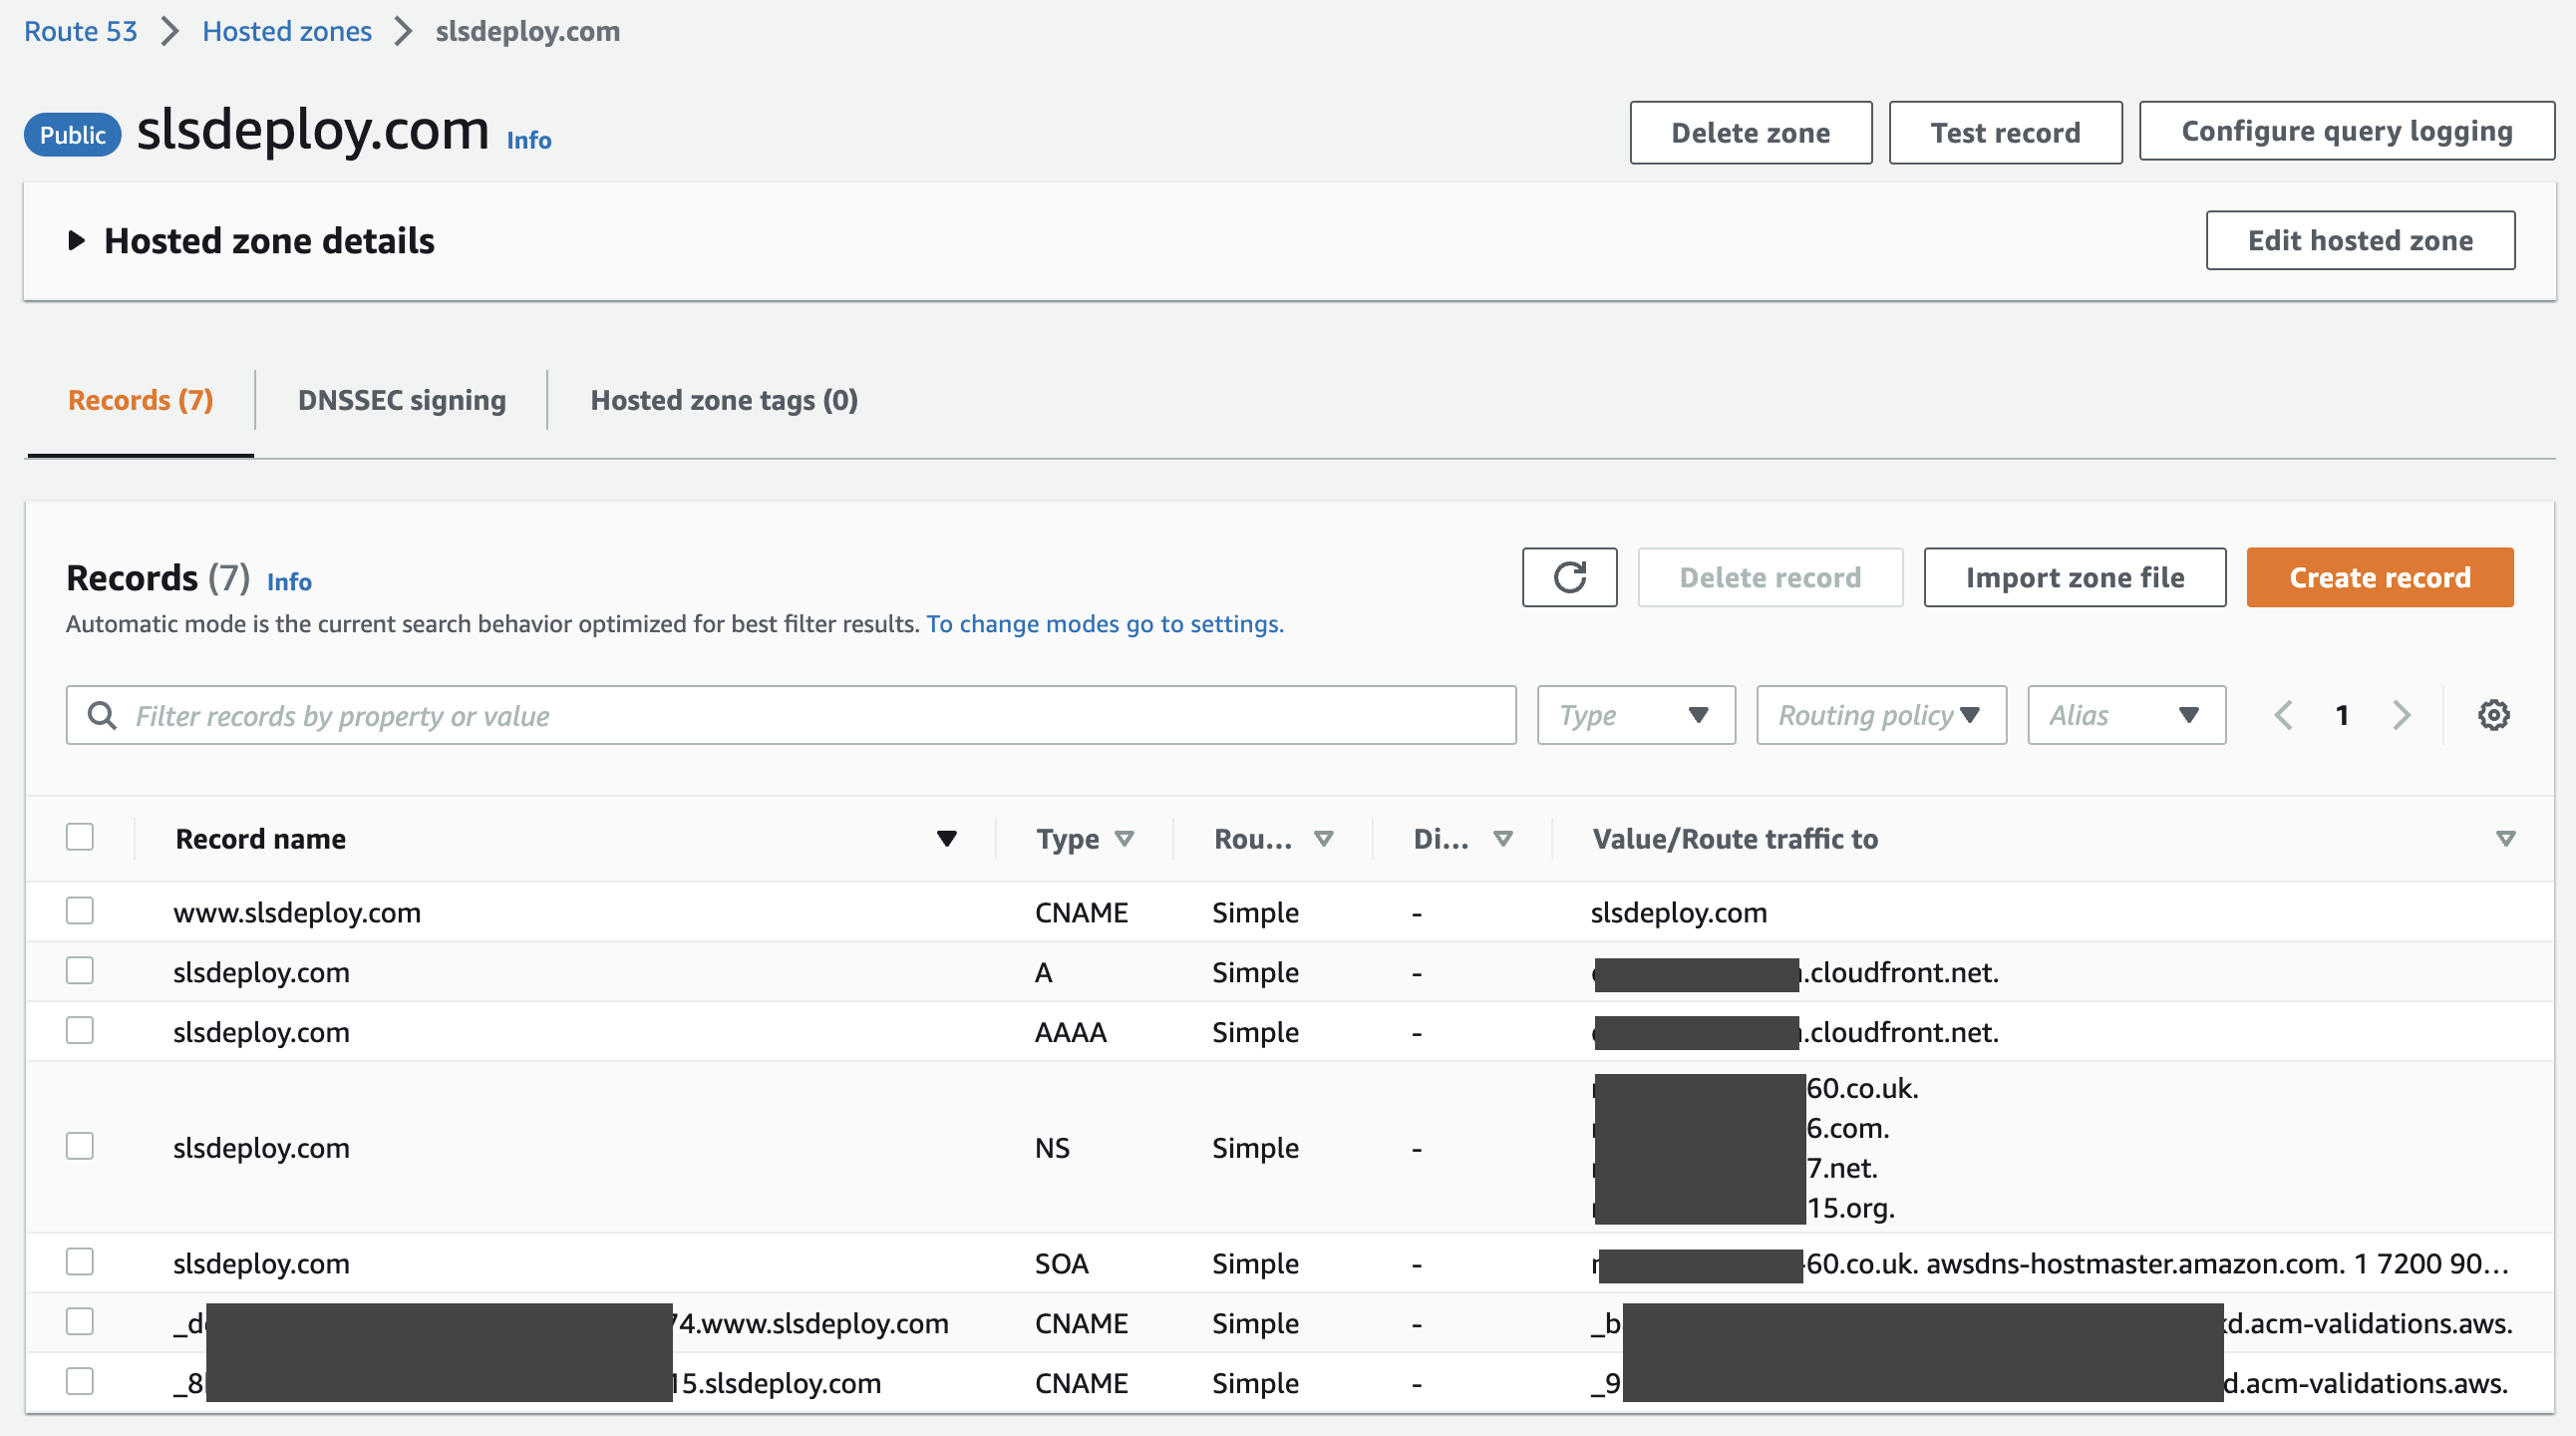
Test the by visiting the target domain name
[Troubleshooting]: 403 Accessing Sub-Domains
The following error may occur if the subdomains are correctly configured in the Hosted Zones DNS settings, but the subdomain is not configured in the CloudFront distribution's settings. To rectify, simply ensure that the CloudFront distribution includes the alias for each subdomain.
403 ERROR
The request could not be satisfied.
Bad request. We can't connect to the server for this app or website at this time. There might be too much traffic or a configuration error. Try again later, or contact the app or website owner.
If you provide content to customers through CloudFront, you can find steps to troubleshoot and help prevent this error by reviewing the CloudFront documentation.
[Troubleshooting]: The Latest Changes from S3 Arn't Being Displayed
The CloudFront CDN caches the files in order to server users more efficiently by storing and returning recently accessed files in a cache. The cached files will likely need to be invalidated.aws cloudfront create-invalidation --distribution-id DISTRIBUTION_ID --paths /index.html
Note: there is a cost associated for each invalidation
What's Next
In the following post, the achieved architecture will be converted into a CloudFormation template to automate the creation and configuration of our resources. This allows additional infrastructure stacks to be created and managed using a single command. These different stacks may include different environments (like testing, development, production, etc), or may be for other similar projects.